Maui Girl Cooks

“One of the very nicest things about life is the way we must regularly stop whatever it is we are doing and devote our attention to eating.” Luciano Pavarotti


4 Comments

A Favorite Lunch

Did you know. . .
. . . that sardines packed in their own oil or extra virgin olive oil are full of good for you omega-3 fats?  It is thought that just 1/2 gram of these fats can significantly reduce your risk of cardiovascular disease.  Avoid sardines packed in vegetable oils, as they are not healthy fats.

Anyone for anchovies?  How about sardines?  I know, I know, these are a couple fish that cause many people to turn up their noses.  Not me though; I love them both.  My intention was to write only about sardines, but I figured as long as we are on the subject of unpopular fishes, I may as well tell you how we like to eat anchovies.  Perhaps our way of eating anchovies will work for you as well, that is, if you want to give them a try.

Once upon a time, I too was among the myriad of folks who did not care for anchovies, as was my husband.  One rainy evening, we were eating pizza at Tony’s Pizza & Italian Restaurant, a favorite Italian restaurant of ours in Bremerton, WA.  That is the night we learned how to eat anchovies.  The secret to liking/loving anchovies on your pizza, according to our waitress, is to order them on the side.  Wow, that really makes a difference!  The salty, fishy flavor permeates the pizza if you bake the anchovies on the pizza, but if you have a little plate of anchovies on the side, it tastes pretty good.  You get an occasional salty punch from the little bits of anchovy.  We have happily eaten anchovies on our pizza ever since!

I have been eating sardines for as long as I can remember.  We had tins of sardines in our pantry when I was growing up, and I admit that even though I ate them, I thought they looked kind of gross.  My recollection is that they were not like the nice sardine filets that we eat now, which are every bit as nice looking as a beautiful piece of fresh salmon {except they aren’t pretty pink}.

Wild Planet Sardines

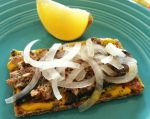
One of my favorite quick lunches is a “fish cracker” and a salad.  And no, by “fish cracker,” I am not referring to those fishy-shaped crackers that you are probably familiar with. . .the ones with no redeeming nutritional value.  My idea of a “fish cracker” is a Ryvita cracker with a plump, meaty and delicious sardine on top.  Of course, there are additional toppings to make it extra tasty.  This is a favorite lunch of mine because it is quick, tasty and super healthy.

This slideshow requires JavaScript.

I understand if you don’t like anchovies, and don’t want to give them a second {first} chance.  But if you like fish, and haven’t gotten into sardines, I highly recommend them.  The health benefits of sardines {& anchovies} are many:

  • They are low on the marine food chain, so toxins like mercury do not accumulate in them.
  • Anchovies and sardines are chock full of healthy omega-3 fats, which impact mood, circulation, glucose, insulin metabolism, blood pressure and heart health.
  • In particular, sardines are high in protein, B vitamins, selenium, calcium, iron, magnesium, phosphorus, potassium, zinc, copper and manganese.  Talk about a powerhouse of nutrition in one little can!  They are my idea of a great “fast food!”

Sources:

The 150 Healthiest Foods on Earth, Jonny Bowden, Ph.D., C.N.S.

The Perricone Promise, Nicholas Perricone, M.D.

A simple salad of arugula {aka “rocket”} and thinly sliced onions, dressed with fresh lemon juice, extra virgin olive oil, freshly ground salt and pepper, goes well with fish crackers.  It’s one of our favorite salads.

Arugula Salad with Onion and Lemon Vinaigrette

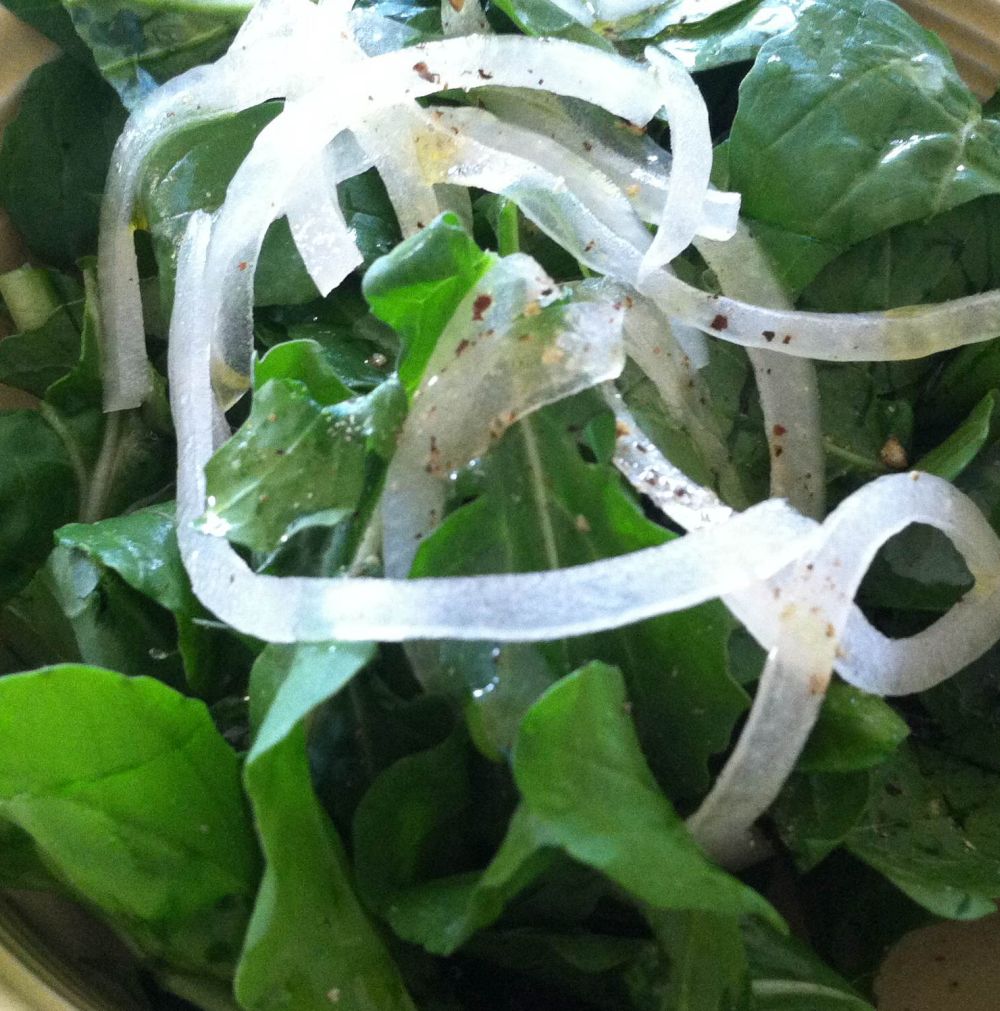
Arugula Salad with Onion and Lemon Juice & Extra Virgin Olive Oil


1 Comment

“The old Romans having expelled physicians out of their commonwealth, did for many years maintain their health by the use of cabbages, taking them for every disease.”  16th century historian

Welcome to my 3  5 9 day post.  Yep, it took 9 days for me to get this written and posted.  Why??  I have no idea!!  No good reason though, that’s for sure.

I worked late last night {Monday}, so took the opportunity to sleep in a little later than usual, which was nice.  It was a breezy “2 blanket night,” the first one for quite a while.  This morning has been one of those putz around the house mornings where I suddenly realized that my walk would have been significantly cooler had I left earlier.  Podcast selected, I popped in my ear buds, put on my hat, sunglasses and shoes, ready to go.  Open door. . .it’s raining!  You might wonder how I could not have known that.  Weather-wise, we live in a very interesting place.  Dark gray clouds may gloomily loom out one window, with a gleaming blue sky out another window, just 20 feet away.  So often, the gray clouds that hang around our house do not drop rain; I would certainly like a bit more rain, as would our plants.  Funny thing to say, from someone who lived in the Pacific Northwest for over 20 years!  The clouds are splashing rain this morning, and I am enjoying every minute of it.

I’ve had half a cup of green tea, and now it looks like a good time to walk.  Be back soon.

I’m back!  More sprinkles soon after I returned, so I guess my timing was pretty good.  Actually, my walk was timed perfectly, as was my choice of routes.  I found a fallen Meyer lemon {I LOVE Meyer lemons!}, which is a cross between a regular lemon and a Mandarin orange.  Meyer lemons have not been available in the United States until fairly recently, and may not be found everywhere.  If you are a lemon lover, and you see Meyer lemons, buy some; they are so delicious.  I come from a long line of lemon eaters, and I can tell you that my mouth is watering right now.  I love lemons sprinkled with salt-so good {not great for the enamel on your teeth, but so tasty}.  Meyer lemons have a floral quality to them, in their flavor and their aroma.  They are thin-skinned, so you can eat the entire lemon.

Meyer lemon wedgeClick here to read a short article/hear a short interview about Meyer Lemons.  I also found a pommelo.  The owner of the pommelo tree told me a few weeks ago that I could pick what I could reach; score!.  I was thrilled to find one that had blown off in the wind, to my good fortune.  Pommelos are similar to grapefruit, but their fruit is not as soft as a grapefruit, and the flavor is a little different.

This slideshow requires JavaScript.

To be continued, tomorrow!

Wednesday- No fallen fruit today, nor rain, just a beautiful blue sky & gentle breeze to keep us nice and cool.

Let’s talk about cabbage.  I love cabbage!  By all accounts, my mom makes fantastic coleslaw.  Even though I like all of the ingredients in her coleslaw, I never cared for it as a kid.  She always gave me a bowl of cabbage with nothing on it, before she mixed in the dressing.  My dad loved her coleslaw because it doesn’t have a sweet dressing.  Here is her recipe.

Mom’s Coleslaw

4 cups finely shredded cabbage
1/2 cup mayonnaise
2 tbsp lemon juice
2 tbsp grated onion
Salt and pepper to taste
Celery seed to taste {my mom says that it is important to use celery seed for best flavor}

My mom always grates her cabbage in a blender, with water, which makes a very fine shred; she said that her mom liked it that way.  After processing in the blender she drains the cabbage well, so the dressing will not be watery.  You can shred your cabbage however you prefer.  Mix the remaining ingredients and mix with the cabbage.  Chill until ready to serve.

My preferred way of eating cabbage has always been cooked, as in corned beef and cabbage, minestrone soup, borscht, etc.  And then I discovered roasted cabbage.  OMG!  Roasting cabbage gives it a depth of flavor that raw cabbage cannot ever hope to achieve.  It is quite delicious, and I have to restrain myself from eating the entire head of cabbage after it emerges from the oven, roasty-toasty brown with soft centers and crispy edges.  Sprinkled with fresh lemon juice, roasted cabbage is delectable and just waiting to be eaten, leaf by leaf, standing up by the stove, where you have put it to cool.  If you manage to have any leftovers, I also find it delicious cold or at room temperature.

Roasted Cabbage with Olive Oil & Lemon
recipe adapted ever so slightly from eat.repeat

1 head of green cabbage
Extra virgin olive oil
Salt & pepper
Freshly squeezed lemon juice

Pull off the large outer cabbage leaves.   Wash the head of cabbage and dry well.  Cut the cabbage in half, and then cut the halves into fourths, leaving you with 8 wedges.  Try to keep a bit of the core on each wedge, so that the wedges have a better chance of staying together.  Put your cabbage wedges on a sheet pan lined with foil.  I like to line my sheet pan with foil to make clean up a little easier.  Brush the cabbage with olive oil and sprinkle with freshly ground salt and pepper.  Roast in a 400 degree oven for 30-40 minutes, flipping the wedges about halfway through.  Roast until the cabbage is browned, even to the point of the edges being crispy brown {much tastier this way!}.   Sprinkle cabbage with lemon juice & eat hot, warm, room temperature or cold.  Yum!

This slideshow requires JavaScript.

Bon appetit!


2 Comments

“Good soup is one of the prime ingredients of good living.  For soup can do more to lift the spirits and stimulate the appetite than any other one dish.”    Louis P. De Gouy, ‘The Soup Book’ (1949)

Have you noticed a change in the weather in your area?  Maybe the mornings are a bit dewier than they were last month, and a sweater hits the spot in the evening.  We have noticed that the mornings and evenings are a little cooler here on Maui, even though the days feel about the same, nice and warm.  The first day of autumn is just around the corner {9/22}, which means it’s time to get out the soup pot.  Our soup pot is never far from the stove.  Even though we live on Maui, we eat a lot of soup, and surprisingly most of it hot soup, not cold.  We live at about 1200 feet altitude, on the slopes of Haleakala Volcano, so it is often cool enough to enjoy soup, especially when the trade winds are blowing, as they are now.  While it may feel warm outside in the sun, the breeze can feel cool in the house.  We eat soup for breakfast, lunch and dinner.  The soups we enjoy are all healthy; they are full of vegetables, high in vitamins and minerals and nutrient dense.   I realize that people who live in places with 3 or 4 seasons probably don’t eat much hot soup in the summer, but like I said earlier, ready or not, autumn is on its way.

If you haven’t made home made soup, I encourage you to try out a few recipes; you will be rewarded with several delicious meals that don’t have to be complicated to prepare.  There are some elaborate soup recipes out there, but the ones I make are pretty straightforward.  I assure you that the soup you create from top notch fresh ingredients will be far superior to any soup you get from a can.

This minestrone is one of our new favorite soups, and I highly recommend it.  This is the link to the original; what follows is my adaptation.

Lentil, Celery and Tomato Minestrone

adapted from the recipe by Martha Rose Shulman, who is the author of “The Very Best of Recipes for Health.”

1 cup lentils, rinsed
1 onion, halved
A bouquet garni made with 2 sprigs each thyme and parsley, a bay leaf, and a Parmesan rind
1 1/2 quarts water
1 tablespoon extra virgin olive oil
3 medium carrots, diced
3 celery stalks, diced
3 garlic cloves, minced {mince & let sit for 10 minutes for health benefits}
Salt, preferably kosher salt, to taste
1 28-ounce can chopped tomatoes, with liquid
Pinch of sugar
3 tablespoons tomato paste
About 1/2 small head of green cabbage, thinly sliced
1/4 cup chopped fresh parsley
Very thinly sliced celery, from the inner heart, for garnish
Freshly grated Parmesan cheese for serving
1. Combine the lentils, 1/2 onion and the bouquet garni with 1 quart water in a saucepan and bring to a boil. Reduce the heat, add salt to taste, cover and simmer 30 minutes.

2. Chop the remaining onion. Heat the olive oil in a large, heavy soup pot or Dutch oven over medium heat and add the onion, carrot, and celery. Cook, stirring often, until the onion is tender, about 5 minutes, and add the garlic and a pinch of salt. Stir together until fragrant, about 1 minute, and add the canned tomatoes with their liquid and the sugar. Bring to a simmer and cook, stirring often, for about 10 minutes, until the tomatoes have cooked down somewhat and smell fragrant.

3. Add the lentils with their broth, the tomato paste, salt to taste, an additional 2 cups water, and bring to a boil. Reduce the heat, cover, and simmer 30 minutes. During the last 10 minutes, add the cabbage.  Taste and adjust seasonings. Season to taste with freshly ground pepper, stir in the parsley and serve, garnishing each bowl with thinly sliced celery heart if you want some crunch, and passing the Parmesan at the table.

Yield: Serves 4 to 6Celery Minestrone Ready to Eat

Like most soup, this is even better the next day.

Nutritional information per serving (4 servings): 276 calories; 4 grams fat; 0 grams saturated fat; 1 gram polyunsaturated fat; 2 grams monounsaturated fat; 0 milligrams cholesterol; 49 grams carbohydrates; 12 grams dietary fiber; 392 milligrams sodium (does not include salt to taste); 17 grams protein

Nutritional information per serving (6 servings): 184 calories; 2 grams fat; 0 grams saturated fat; 0 grams polyunsaturated fat; 2 grams monounsaturated fat; 0 milligrams cholesterol; 32 grams carbohydrates; 8 grams dietary fiber; 261 milligrams sodium (does not include salt to taste); 11 grams protein

Notes:

* You may use any lentils that you like.  I usually use brown lentils, but if you like your lentils to hold their shape, you may want to use the French green lentils {lentils du puy}.

* I highly recommend the celery & Parmesan garnish.  Generally speaking, I find that if a recipe has a garnish, it’s best to put in the extra effort to put it on your soup.  A garnish can take your soup to a higher level!

*Please, please, please do not use what they call “Parmesan cheese” that comes in the green can!  Use the real thing; if you don’t use the real thing, you won’t have the Parmesan rind which adds a huge amount of flavor to your soup.  It really does make a difference!  Get more ideas on using Parmesan rinds to elevate your dishes to a whole other level here.

* If you do not have any kitchen twine, put it on your shopping list, and then you can tie your bouquet garni with a green onion top or chive {don’t tie too tight or they will break!}.

Bon appetit!


3 Comments

“Cheese – milk’s leap toward immortality.”  Clifton Fadiman

Before we get to tonight’s dinner, these quesadillas, I have some lovely flower pictures from today’s walk to share with you.


And now for the quesadillas!

quesadilla on plate

There are quesadillas, and then there are quesadillas worth eating.  If you would like a quesadilla that is more than a white flour tortilla filled with melted cheese, then keep reading.

Our quesadillas are filled with cooked spinach or Swiss chard {a lot of it}, roasted peppers & cheese.

We love quesadillas and have been tweaking our current recipe for over 5 years, and think they are now just about perfect.  There have been several versions of this recipe, each change making an improvement on an already good thing.  It is our favorite meal to cook, and one we make weekly.  This is truly a “team meal” for us.  I prep everything and my husband does the cooking.  While he is cooking, I clean everything up so that we only have 2 plates to wash when we’re finished eating.  We are a well-oiled machine when it comes to making quesadillas!

Before I get into the details of how to make these scrumptious quesadillas, I should tell you about the tortillas we use.  We eat food that is good for us {at least 95% of the time}, so it was important to find tortillas that are healthy and taste good.  Often times, breads that are healthy taste like cardboard, or if you’re lucky, hay.

Perhaps you have had the unfortunate experience of buying tortillas for a recipe, and then having them go moldy in the refrigerator.  These are the tortillas that we like & here is how we take care of them so they are ready when we want a quesadilla or a wrap.

Fresh Tortillas in Bag  These are tasty tortillas that we can feel good about eating!

blog freezing tortillas  Stagger your tortillas on a cookie sheet & freeze.  They will curl a little, but you can easily put them bag into the bag you bought them in.  They won’t stick together like they would if you just put the whole bag in the freezer.  I used to separate them with a piece of wax paper; totally unnecessary!  When you are ready to use them, put them on a plate, and flip them a few times while they thaw, so that they aren’t as curled.

This slideshow requires JavaScript.

Quesadillas with Spinach {or Swiss chard} & Roasted Peppers

This is more of a guideline than a specific recipe, as far as amounts are concerned.  Feel free to adjust quantities & ingredients to your liking!

2 large whole grain tortillas

2 quarts raw spinach or Swiss chard, washed carefully and thoroughly dried, then cut into strips {I mince the stems & sauté them with onions, jalapenos & garlic}

Peppers, cut so that they are in relatively flat pieces {bell peppers, poblanos or Anaheims are all great here}; we use 1 bell pepper, or about 3 smaller size peppers

1/2 small onion, finely diced

1 jalapeno, finely diced {add more or less depending on how much heat you like}; or you can use dried red pepper flakes, Serrano peppers, etc.

3 cloves garlic, minced & allowed to sit for 10 minutes {to achieve the health benefits}

Approximately 4 ounces of cheese, thinly sliced {we like Gruyere because it is a delicious low fat cheese that melts well}

The most time consuming part of this recipe is the prep; once everything is sliced and diced you are ready to put your quesadillas together.

Spray a large pan with pan spray, and then add a film of olive oil.  Sauté the peppers over medium heat, until they have a bit of color and are beginning to get tender.  They do not have to be completely tender.  Remove peppers to a plate lined with a paper towel, and blot to absorb any extra oil.

In the same pan, sauté the onion, jalapeno, garlic and stems over medium heat until almost tender. Add the leaves and toss everything together for about a minute, or until leaves are just wilted.  Remove from the heat.  The leaves should be glossy, dark green and gorgeous.

You are now ready to put your quesadillas together!

Place tortilla on a dinner plate.  On half the tortilla, place the cheese, top with peppers and then the greens. Spray a skillet {we use cast iron} with pan spray and then film with olive oil.  Fold the tortilla in half and put in the skillet preheated to medium to medium-low.  The objective is to crisp the tortilla, heat everything through, melding the cheese with the greens and peppers, without burning the tortilla.  Flip the quesadillas several times;  if you flip one, flip the other.  My husband, the quesadilla cook, said he flips them at least 3 or 4 times.  Adjust the heat so that they do not brown too quickly on one side.  Serve them with the cheese on top, so gravity can draw it down through the greens and peppers.

Cut into thirds or fourths & eat immediately.  I cut the quesadillas with my kitchen shears, cutting through the top tortilla first, and then cut the bottom tortilla with the filling; this ensures the filling not squishing out when you cut them.  We eat ours with Tapatio Hot Sauce {a lot of it!}, and sometimes with a little sour cream or plain yogurt {ok, I sometimes put plain yogurt on mine}.

Notes:
My husband says that a nice glass of red wine is really nice while you are cooking these, and I concur!
* We tried soft goat cheese in these, but weren’t crazy with the results.  We love goat cheese, but not here.
* Go easy on the oil-you don’t want your quesadillas to be greasy.
* Be sure your greens are thoroughly dry, so that they aren’t too wet {soggy quesadillas not great}
* Use a sturdy tortilla.  We tried brown rice tortillas, and while they were super tasty, they cracked right down the middle when we folded them.
* The first time you make these, you may want to make a thinner quesadilla, for ease in turning.  They can be a bit tricky to turn over.
* Jarred roasted peppers are fine!  Before we moved to Maui, we used the jarred piquillo peppers from Trader Joe’s.
* I LOVE a good mouth burn, and usually get one with these quesadillas.  But if you don’t, leave out the hot peppers, simple as that.
* If your quesadilla is a little spicier than you like, sour cream or plain yogurt cools it off very nicely.

Bon appetit!


1 Comment

Salad with Purslane & Ribbons of Parmesan

“When weeding, the best way to make sure you are removing a weed and not a valuable plant is to pull on it.  If it comes out of the ground easily, it is a valuable plant.”  Author Unknown

I do not know if purslane comes out of the ground easily or not, but I have seen it defined both as a weed and a valuable plant.  Purslane is purported to be a healthy plant that we should be enjoying.  It is a good source of omega-3 fatty acids, antioxidants, vitamins and minerals.  Check out the articles at the end of this post if you would like to read more about purslane’s health benefits.  My husband bought our first bunch of purslane 2 weeks ago, at the Upcountry Farmers Market.  It’s great!  What I like most about purslane is its chew, due to the fact that it is a succulent.  I think it has a subtle flavor, not at all assertive, but just tasty. . .green.  Apparently it grows everywhere, but I can’t say I’ve encountered any on my walks around Pukalani, where we live.  You will most likely not find purslane at your local grocery store, but look for it at your farmers market.  Or grow it yourself; from what I’ve read, it is easy to grow.

When I cleaned the first bunch of purslane, I meticulously removed the leaves from the stems.  I discovered on the second bunch that “de-leafing” {is that a word??} the stems is not necessary, and that the stems also add a bit of chew to a salad.  The leaves are in clusters on the stems, so that makes them pretty in a salad.

Salad with Purslane & Ribbons of Parmesan

This is not a tossed salad, but more of a composed salad, which I think is prettiest served on a plate. The ingredients are few and the salad is delicious.  When you start with excellent ingredients, you do not need much to create great food.

Place a layer of tender lettuce on a plate.  Some good choices are Bibb, Manoa or red leaf.  A crunchy lettuce like romaine doesn’t work in this salad.  Texture is important in this recipe; there is a pleasant “chew” but it isn’t a crunchy salad.

Top the lettuce with some onion that you have sliced paper thin.  Use whatever type of onion you prefer, although I wouldn’t choose green onions for this.  Slicing the onion super thin makes it seem less pungent, making it easier to eat for the “non-onion types.”

Now add a scattering of paper thin purple cabbage.

Top with purslane, preferably in clusters of leaves, as opposed to individual leaves; this adds to the salad’s texture.

Sprinkle the salad with some pumpkin seeds that you have pan roasted, preferably in coconut oil.

Season the salad with freshly ground salt and pepper, then sprinkle with fresh lemon juice {about 1/4 of a juicy lemon per salad} and a drizzle of good extra virgin olive oil.  Use a light hand with the dressing, as you don’t want your salad to be swimming in dressing.

Finally, take a vegetable peeler and shave some nice ribbons of fresh parmesan cheese over the salad.

Salad with Purslane and Ribbons of Parmesan

Related articles

Bon appetit!