Maui Girl Cooks

“One of the very nicest things about life is the way we must regularly stop whatever it is we are doing and devote our attention to eating.” Luciano Pavarotti


4 Comments

A Muffin to Love

Before we get down to these scrumptious muffins with the craggy tops, filled with whole grains, fruits and nuts, I have a few flower pictures from around our neighborhood.

This slideshow requires JavaScript.

We love muffins at our house, and these are one of our favorites {we have too many favorites to choose just one!}.  My recipe is adapted from the Apple-Cranberry Muffins recipe found in Once Upon a Tart {Mentesana and Audureau}, which is one of my favorite cookbooks.  Once Upon a Tart is “New York City’s favorite bakeshop and cafe.”  I have never been there, but if I ever make it back to New York City, I will be sure to drop in for lunch and dessert.  Karen Dennis posted the original muffin recipe on her blog, and you can find it here.  I haven’t met many recipes I didn’t want to play around with in some way, so today I will share my spin on this tasty muffin.  It is a delicious muffin, particularly when you top it with a smear of good butter.  Speaking for myself, it is important to remember the butter, salted or unsalted, when you enjoy a muffin or slice of quick bread {or any bread for that matter}.  Butter offers up a delicious creamy contrast to the fruit and nut goodness that are these muffins, making them even more delicious than when au natural.  So, without further adieu. . .


Muffin with egg and asparagus

I love muffins with eggs {fried eggs in particular} and a fresh spring vegetable.  This was a tasty and healthy breakfast, I might add!


Apple Cranberry Apricot Muffin

Look how craggy the tops are, with tender morsels of Granny Smith apples, tart-sweet cranberries, chewy apricots & crunchy walnuts.  There is no shortage of nooks and crannies for butter to hide.  Delicious!


Apple Cranberry Apricot Muffin Split with Butter


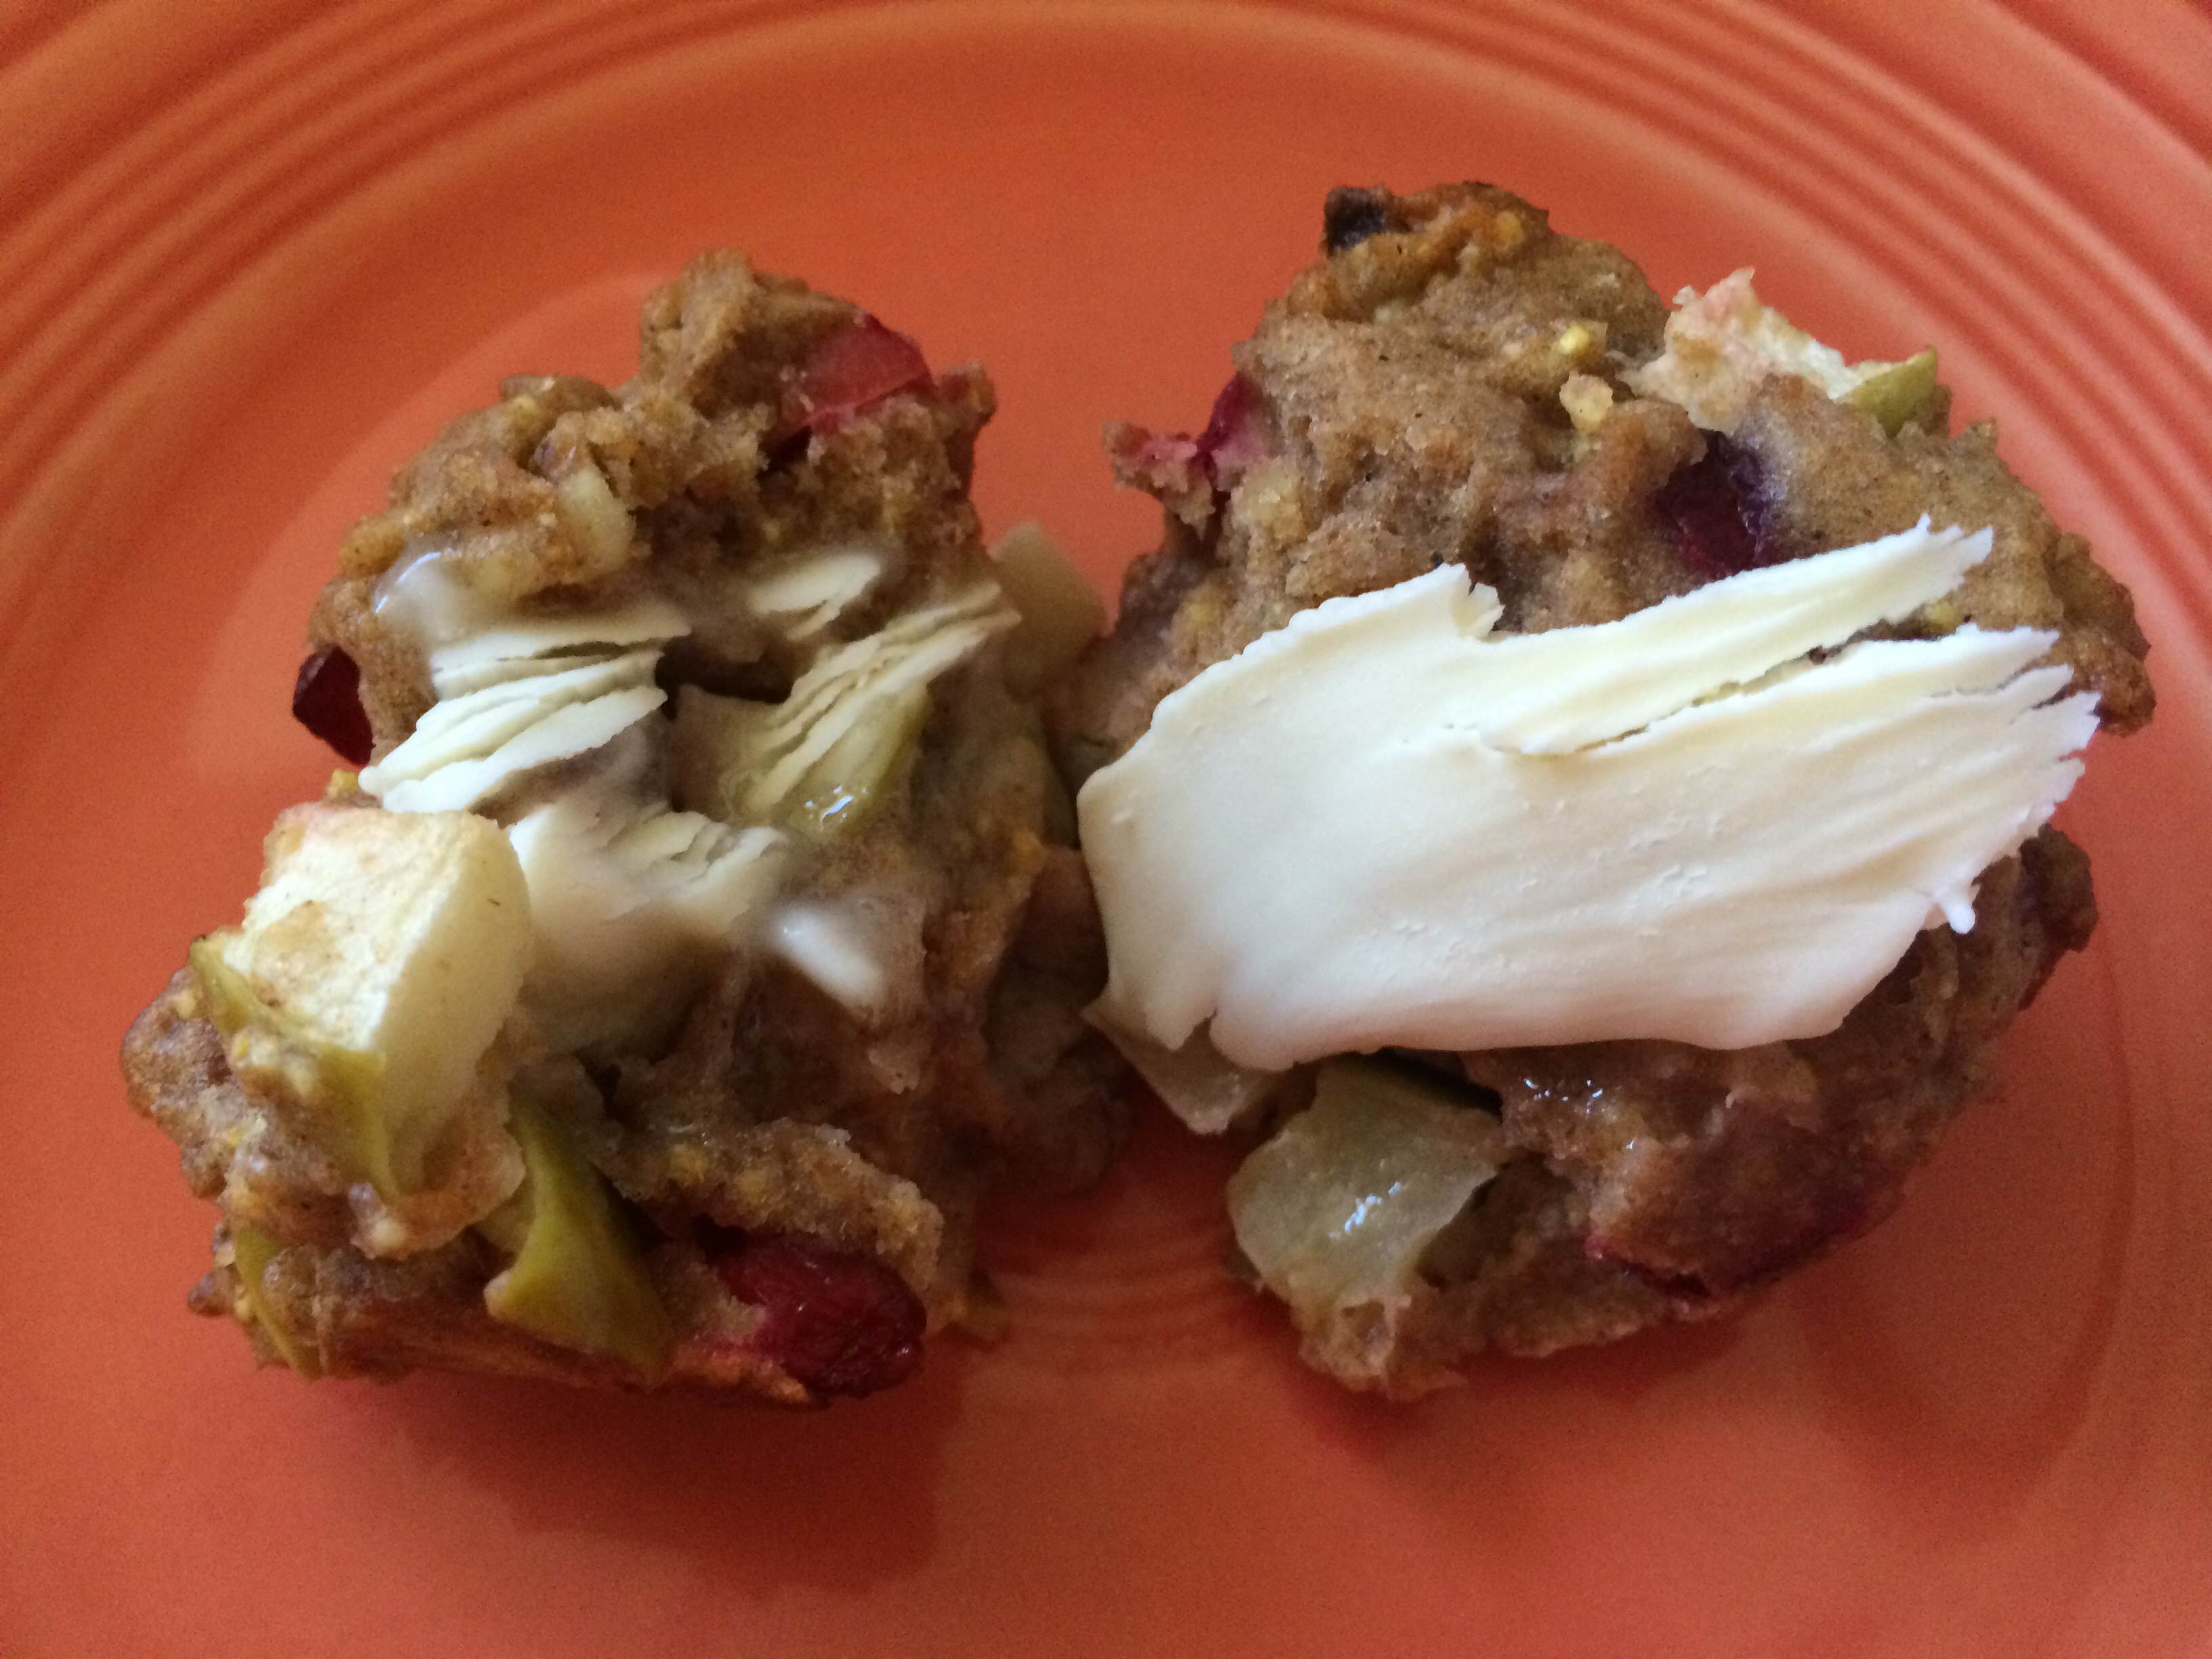
It just looks like a lot of butter, but isn’t really!


Apple, Cranberry & Apricot Muffins
adapted from Once Upon a Tart’s Apple-Cranberry Muffins

We still have a bag of cranberries in the freezer, which are totally fine, but I’m sure blueberries would also be awesome in these muffins, if  you don’t have cranberries.

1 1/2 cups whole wheat flour
1/4 cup medium grind cornmeal
1/4 cup dark rye {light rye would be fine}
1 tbsp flax seed meal
3/4 tsp baking powder
3/4 tsp cinnamon
1/2 tsp salt
2 large eggs
1/2 cup sugar
3/4 cup neutral flavor oil {I used organic canola oil}
1 tsp vanilla
1 cup broken walnuts
1 medium size tart apple, such as Granny Smith, cored but not peeled, and cut into 1/2 inch dice
1 cup whole frozen {or fresh} cranberries
3/4 cup chopped dried apricots {preferably California apricots, as they are tastier and less sweet than Turkish apricots}

Grease 12 muffin cups with butter or pan spray.  Preheat the oven to 400 degrees Fahrenheit.

Whisk the dry ingredients together in a medium size bowl until well mixed.

In a large bowl, whisk the eggs to break up the yolks.  Add sugar and continue to whisk for a few minutes, until the mixture begins to pale in color.  Whisk in the oil and vanilla.

Gradually add the dry ingredients to the wet, stirring with a wooden spoon until just a little flour is visible.  Add the walnuts, apples, cranberries and apricots.  Stir gently until there is no trace of flour visible.

Divide the batter evenly into your muffin cups, filling them almost to the top.

Place the muffin tin onto the center rack of the oven, and bake for 20 minutes, until a toothpick comes out clean or with just a few moist crumbs.  Do not over-bake.  Remove the muffins to a cooling rack and cool completely, except those that you will enjoy warm {with a swipe of good butter!}.

Notes:

  • I leave the apple unpeeled; we like the chewiness that the peel adds {and fiber too!}.
  • We get our dried apricots from Trader Joe’s.  This is one of the items we ask people to bring to Maui when they ask, “Do you want anything from Trader Joe’s?”  The answer, of course, is a resounding “YES!”  We like the California Slab Apricots Blenheim Variety.
  • I think I have established elsewhere on this blog that I prefer large pieces of nuts in baked goods, so the walnuts are broken.  There are a few exceptions to this rule, but not many.
  • Muffins freeze well, wrapped in a zipper lock bag {squeeze out as much air as you can}.

Bon appétit!

A Delicious Loaf

4 Comments

“The smell of good bread baking, like the sound of lightly flowing water, is indescribable in its evocation of innocence and delight.” – M.F.K. Fischer

This slideshow requires JavaScript.

I’ll start by apologizing for my finished bread looking burned; it was not burned.  No matter how I aimed my camera, part of the loaf looked black, which is why the picture is cropped.  Sometimes a photo just doesn’t do justice to its subject.    Now that that is out there, let’s move on.

I love baking yeast breads because I find it relaxing and therapeutic.  Not that I’m necessarily in need of therapy when I decide to bake some crusty, yeasty and delicious loaves.  It’s just that it feels good to get your hands in the dough and feel the magical transformation from wet sticky dough to dough that is silky and elastic, and a pleasure to touch.  Homemade bread actually engages all of your senses-

~There is the smell . . . yeasty fragrance wafting up from the bowl of blooming yeast.  “Blooming yeast” sounds like a British expression; in this case it means to put the dry yeast into warm water to dissolve and begin activating, so your bread will rise properly.

~ The tactile nature of bread dough is that it goes from sticky to silky, shaggy to supple

~ Visually appealing is your bread when it emerges from the hot oven, golden and brown, like it just spent the day on a glorious tropical beach {Maui??}

~ If you were able to achieve a nice crisp crust, you will hear that crust shatter when you tear or cut into your beautiful bread.  Maybe it’s the kind of crust that sends pieces of toasty shards over the edge of the counter to the floor when it’s cut.

~ Last but not least is the taste . . . yeasty, whole wheat flavor {or maybe rye} made better with thin slices of good butter.  Or perhaps you have chosen a smear of fresh goat cheese, or a dip in some fruity extra virgin olive oil showered with freshly ground salt, pepper & herbs.  My dear readers, it doesn’t get any better than this!

For tips on baking yeast breads {proofing the yeast, shaping the loaves, etc.} click here.

This recipe produces a bread that is dense, chewy and slightly sweet, with a crisp crust when toasted.  We had a turkey sandwich on it a couple days ago, and it was most excellent.

Whole Wheat Oatmeal Honey Bread

adapted from Honey Oatmeal Bread from Bread Winners {Mel London, 1979}

2 cups boiling water

1/2 cup mild-flavored honey

2 tbsp unsalted butter

2 tsp salt

1 cup/100 grams uncooked rolled oats {not quick cooking}

1 pkg dry yeast

1/4 cup lukewarm water {I use water that is between 95 & 115 degrees.}

*3 1/2 cups/490 grams to 4 cups/560 grams whole wheat flour

*1 cup/110 grams ground oats {uncooked rolled oats processed in a food processor until you have 1 cup}

1 cup raw sunflower seeds

*I wanted my bread to taste more of oats, so one of my adaptations was to add a cup of ground oats in place of 1 cup of whole wheat flour.  Feel free to use all whole wheat flour, or other flour of your choice.

Glaze:
Honey
Uncooked rolled oats

In a large bowl, stir together boiling water, honey, butter, salt and rolled oats.  Let stand for 1 hour.

In a small bowl, dissolve the yeast in the lukewarm water.  Add to the oat mixture.  Stir in the flour, 1 cup at a time and beat well.  I start with the ground oats, and then add whole wheat flour until the dough is not super sticky.  Stir in the sunflower seeds before the dough gets too stiff.  It will be a little sticky, but that will be remedied as you flour your counter to knead the bread.

Turn out the dough onto a lightly floured surface and knead until dough is smooth and elastic {about 10 minutes}.  If necessary, add enough flour to keep dough from being too sticky.  Wash the big bowl you just used, rub some olive oil around the bottom and sides and add your ball of dough.  Turn the dough to coat all the sides.  Cover the bowl with a towel or damp cloth.  Place in a warm spot and allow to double in bulk-about 1 1/4 hours.  I turn on my oven for a minute or 2 to get it slightly warm, and that is where I put my dough to rise.

Turn out onto floured counter, knead for 1-2 minutes, shape into 2 loaves and place into well-greased loaf pans {9” x 5”}.  Cover and place in a warm spot until almost doubled in bulk {about 45 minutes}.

Bake at 350 degrees for 40 to 50 minutes.  Tops should be well browned and the bottoms should sound hollow when rapped with your knuckles.  I look for a temperature of 200 degrees when I insert the instant read thermometer in the bottom of the loaf.

For a delicious glaze, brush tops of bread with honey that has been slightly warmed, then sprinkle with oats.  It looks pretty with the honey & oats on top, but I must say that the oats don’t stick very well.  Maybe I don’t use enough honey!

As hard as it might be, you should cool the bread completely on a wire rack before slicing.  We {or I should say my husband} often finds it difficult to do this!  Enjoy the rewards of your efforts!

Bon appetit!

This gallery contains 6 photos


4 Comments

Cranberries for Breakfast

A few tidbits about cranberries. . .
~ The cranberry is native to North America.
~ Cranberries bounce because of air pockets inside the fruit.  They are also called bounceberries.
~ If you were to string all of the cranberries harvested in North America last year, it would reach from Boston to Los Angeles more than 565 times!

Source of information:  http://www.oceanspray.com/Kitchen/Plan-It/Family-Fun/Cranberry-Fun-Facts.aspx

Some time ago, I posted a few ways that we like to eat plain yogurt.  Cranberry season is here, which means we can swirl some raw cranberry orange relish into creamy plain yogurt for a delicious breakfast treat.  Topped with walnuts & a sprinkling of raw cacao nibs, it makes a great breakfast with a piece of toast and some tea.  As I mentioned in a previous post, our favorite yogurt is Nancy’s.

Nancy's Plain Yogurt

Nancy’s Plain Yogurt

When you open up a new yogurt, stir it well until all the lumps are out and it is super creamy.  Add whatever you like to make a healthy and delicious breakfast.

Plain Yogurt with Cranberry Orange Relish & Broken Walnuts

Plain Yogurt with Cranberry Orange Relish & Broken Walnuts

You could stop with the cranberry orange relish {recipe here} and walnuts, or do as I did and sprinkle a few raw cacao nibs over the top.  In one fell swoop, you can boost the taste & the nutrition of your creamy bowl of yogurt.  What a deal!

Try some raw cacao nibs on your bowl of yogurt!

Try some raw cacao nibs on your bowl of yogurt!

I enjoy having some toast with my yogurt.  It adds somewhat of a “savory” bite to counter the yogurt’s sweetness, even though this yogurt isn’t super sweet, since it only contains a bare minimum of sugar.  I wrote about this bread before, but it’s worth revisiting.  It is simple to make & tasty to eat.

Date Walnut Cinnamon Bread

Date Walnut Cinnamon Bread with Star fruit

Better eat it quickly, because the butter is almost melted!  I prefer my butter sitting on top in cold, thin slices.  Mmmmmm!  This bread is just about as good as cinnamon rolls, but a lot easier and quicker to make.  With the cranberry orange relish, more fruit isn’t really required, but the star fruit makes a pretty addition to the plate.  Aren’t they cute?  Star fruit is a tropical fruit whose season runs from July-February in the U.S.  It is a good source of Vitamin C, potassium and fiber.  According to Food Chemistry, star fruit is a good source of antioxidants, particularly the kind found in green tea and red wine.

Date Walnut Cinnamon Bread
adapted from Easy Little Bread

1 1/4 cups / 300 ml warm water (105-115F) 2 teaspoons active dry yeast (one packet)
1 tablespoon runny honey
1 cup/140 grams whole wheat flour
1 cup/100 grams oats
1 cup/125 grams unbleached white flour
3 tsp cinnamon
1 1/2 teaspoons fine grain sea salt
5 dates, snipped into small pieces
1 cup broken walnuts
2 tablespoons butter, melted, for brushing {you probably won’t need it all}

In a medium bowl, sprinkle the yeast onto the warm water and stir until the yeast dissolves. Stir in the honey and set aside for a few minutes, until the yeast blooms and swells a bit – 5 – 10 minutes.

In the meantime, mix the flours, oats, salt, cinnamon, dates and walnuts in a large bowl. Add the wet mixture to the dry and stir very well.

Brush a 9” x 5” loaf pan {8 cup} generously with some of the melted butter. Turn the dough into the tin, cover with a clean, slightly damp cloth, and set in a warm place for 30 minutes, to rise.

Preheat the oven to 350F / 180C, with a rack in the middle. When ready, bake the bread for 35-40 minutes, until golden and pulling away from the sides of the pan. I finish things up by leaving the bread under the broiler for just a heartbeat – to give the top a bit deeper color. Remove from oven, and turn the bread out of the pan quickly. Let it cool on a rack so it doesn’t steam in the pan. Serve warm with butter.

Makes 1 loaf.

Bon appetit!


3 Comments

“How did it get so late so soon?”  Dr. Seuss

It’s a fact. . .I am behind.  I am behind in my blogging and I am behind in the online class I am taking {HarvardX: SPU27x Science & Cooking: From Haute Cuisine to Soft Matter Science}.  In addition, I am under the weather.  But it’s not being under the weather that has caused me to be behind; I have no good excuse for that, other than the fact that time gets away from me.  It always has, and I suspect it will continue that way into the foreseeable future {my husband certainly thinks so}.  I have not worn a watch since I stopped teaching in June of 2011, and I like it that way.  I love days when I could care less about what time it is, which are the 5 days a week that I do not go to work.  When I have something going on, I check the clock periodically, but other than that, I like just being present in the moment.

Since I am “lying low” around the house for a few days as I get well, I am going to try and do some catching up.  Yesterday, I finished up the lectures on the concept of elasticity {measured by determining how a food resists compression-think overcooked tough steak compared with rare tender steak}, which was the topic 2 weeks ago.  Today, I am hoping to start watching the lectures on diffusion and spherification, the topics from  last week.  Before next Tuesday, when the new lectures are posted, I need to view the lectures on this week’s topic of heat transfer.  Of course, I also have labs and homework to get done!  Where did the time go, and why did I let myself get behind?  This class is quite interesting, but the science is not for the faint at heart. Many moons have passed since I’ve thought about physics and chemistry concepts and equations; yikes!

I have a number of favorite ingredients, one of which is Parmesan cheese.  Like I mentioned in a previous post, I only consider fresh Parmesan that you grate yourself {Parmigiano Reggiano, Pecorino Romano, etc.}.  The stuff in the cylindrical green can just doesn’t cut it for me.

It doesn’t take long to grate up some fresh Parmesan and then pop it into a container to use on all kinds of foods.  You can use a hand grater, box grater or food processor.  It’s great on all kinds of salads, pasta, pizza, etc.

Grated Parmesan on Waxed Paper

Parmesan in Jar

Recently, we have gotten into Caesar salads, which of course include Parmesan cheese.  I have several Caesar dressings that I like, none of which come from a bottle.  One dressing, the one I’m going to share with you today, is from Alice Waters’ book The Art of Simple Food:  Notes, Lessons and Recipes from a Delicious Revolution.  The other recipe, which I haven’t made for quite awhile, I will share once I have made it again.  Of course, we enjoy Caesar salads with romaine, which is traditional, but Caesar dressing is also great on kale.  Without further adieu, because I have a lecture to watch on diffusion and spherification, here is one of my favorite recipes for Kale Caesar Salad.

kale caesar 1

Kale Caesar Salad

1 bunch kale, stemmed, well washed and dried
Caesar dressing
Croutons for garnish

Caesar Dressing {from The Art of Simple Food:  Notes, Lessons and Recipes from a Delicious Revolution

Mix together:
1 tbsp. red wine vinegar
1 tbsp. fresh lemon juice
2 garlic cloves, pounded to a puree
2 tsp chopped salt-packed anchovies {about 2-3 filets}
Salt
Freshly ground black pepper

Whisk in:
1/4 cup extra virgin olive oil

Right before serving, grate:
1/2 Parmesan cheese {about 1 ounce}

Whisk into the dressing:
1 egg yolk

Add a small handful of the grated cheese and whisk until thick.  Taste for salt and acid with a piece of kale.  Adjust the seasoning as needed.  Put the kale in a large bowl, pour three quarters of the dressing over the salad and toss.  Taste and add more if needed.  Add most of the rest of the grated cheese and toss lightly.  Arrange the salad on plates.  Garnish with the last of the cheese, croutons and a grind of pepper.  Serve with a wedge of fresh lemon.

Croutons {homemade croutons are immeasurably better than store bought}

Toss about 20 small bread cubes {about 1/2 inch square} with 1 1/2 tbsp. extra virgin olive oil and a little salt.  Spread on a baking sheet and toast in a 350 degree oven for 10-12 minutes, or until golden brown, stirring occasionally for even browning.

Notes:
*  I use anchovies packed in a jar, which I think would be less salty than the salt-packed ones.  I have never tried salt-packed anchovies.  I sometimes rinse sardines and then blot them dry to reduce their saltiness.
*  If you prefer not to use raw egg in your dressing, you could use a pasteurized egg.   I’ve used pasteurized eggs before with success.
*  Always use freshly squeezed lemon juice.  Avoid the bottled stuff, which is light years away from tasting like fresh.
*  For croutons, I always use whatever whole grain bread I have on hand.  May as well make the croutons as healthy as a crouton can be!

Bon appetit!

This is a link to Melissa Clark’s {food writer for the NY Times} take on anchovies:
http://www.melissaclark.net/blog/2011/04/anchovies.html

Cultured Foods {aka Bugs, Who Needs ‘Em?}

1 Comment

“Fermented foods help people stay healthy,” Sandor Katz author of New York Times best-selling book “The Art of Fermentation.”

Before we get to the heart of the matter of cultured foods, here is a photo of yesterday’s sky.  I was at the pool and the sky was so beautiful I had to take a picture.  The picture doesn’t do it justice, but you get the idea.

October sky

My husband and I do a good job of learning about what constitutes a healthy lifestyle in terms of eating and exercise, and then we implement what we have learned to the best of our abilities. Our latest foray into healthy eating is fermented {cultured} foods. Please understand that in no way do I consider myself an expert on cultured foods; I am far from an expert, and know just enough to be dangerous. We have been eating cultured foods for years, because we enjoy them, but have intentionally added more into our diet because of the health benefits. Here are some of our favorite cultured foods, all of which we buy at Mana Foods, for those of you on Maui:
~ YogurtNancy’s Yogurt {contains 11 different culture strains} has been a staple for more than a decade.
~ Sauerkraut and Fermented Pickles- We have recently started purchasing sauerkraut that is raw and unpasteurized, so that the beneficial microbes are available to us. One of our favorite brands is Sonoma Brinery. Farmhouse Culture makes fantastic sauerkraut as well. I LOVE their Smoked Jalapeno Kraut; I don’t find it at all smoky, but perfectly spicy! My husband prefers the Ginger Beet flavor, which I also like, but not as much as the Smoked Jalapeno. Both of these companies offer excellent products that are reasonably priced.  If you want sauerkraut, these are a must try!
~ Kombucha We drink a little kombucha most days. Our kombucha comes from Maui Kombucha.
~ GoodBelly Probiotic Drink This is a delicious nondairy nectar-like drink. My favorite flavor is Mango.  If you sign up for their Goodbelly Challenge, they will email you some coupons!
~ Sour Cream- We often spoon a bit of cultured sour cream on our quesadillas. Sour cream is always a yummy addition to a spicy dish.
~ Tempeh Tempeh is a fermented soy product from Indonesia. Our current favorite way to eat tempeh is seasoned with freshly ground salt and pepper and sautéed in a bit of coconut oil until golden brown.   Eat with ketchup and you have something that resembles French fries. A heavy drizzle of Sriracha Sauce is a great addition, if you like a little mouth burn, like I do.  We also make a delicious sandwich that we call a “TLT” meaning Tomato, Lettuce and Tempeh.  It is fantastic on toasted ciabatta bread.  Our tempeh is in the freezer until we are ready to eat it, and then it thaws very quickly.
~ Miso- I like kale salad with Outstanding Miso Sesame Dressing. There is also miso soup, which is delicious!

Here are a few of the cultured foods we’ve enjoyed in the last few days:

This slideshow requires JavaScript.

Tempeh Sautéed in Organic Coconut Oil

Slice tempeh into approximately 1/2 inch slices.  Spray skillet {we use cast iron} with pan spray, then melt about 1 tbsp. of coconut oil.  When the oil is hot, add the tempeh slices.  Season with freshly ground salt and pepper to taste. Sauté, turning occasionally, until golden brown.  Serve hot with ketchup and Sriracha Sauce, or whatever you like.

This slideshow requires JavaScript.

Yogurt with Pineapple, Peach and Cranberry Preserves

Put some yogurt in a bowl, and top with homemade preserves, and your choice of any or all of the following toppings:  unsweetened coconut, maple syrup {the real stuff please, preferably Grade B}, good quality honey, cinnamon, cacao nibs, nuts, hemp seeds, ground flax seeds, Buckwheat Chia Crunch  or anything else you’d like.

Pineapple, Peach and Cranberry Preserves

**This is really more of a guideline than a specific recipe.  You can adjust everything to your taste, including changing the fruits to what you have available.

1 Maui Gold pineapple
1 quart chunked fresh or frozen peaches
2 cups fresh or frozen cranberries
1 cinnamon stick
approximately 1 tbsp. good quality honey
Juice of 1/2 a juicy lemon
Grind of salt

Get a Maui Gold pineapple if you can {we buy ours at Costco, maybe Mainland Costco sells them also-I think they do}, otherwise a “regular” fresh pineapple will do.  Cut up the pineapple into chunks {see previous pineapple blog post}.  Put all of the pineapple chunks into a wide-mouthed saucepan {for better evaporation of the liquid}.  Add 1 quart of peach chunks {we used the peaches we froze in August} and 2 cups fresh or frozen cranberries.  You can certainly use a different berry if you are not a cranberry fan, but you can’t really identify them as cranberries as far as taste goes .  Squeeze half a lemon and add the juice, and then throw in a cinnamon stick and a grind of salt.  Spoon in some good quality honey to taste.  We used about 1 tbsp.  Bring to a boil, and then turn down the heat and simmer on low until thickened.  The timing will depend on how juicy your fruit is.  The  preserves will thicken as they cool.

These preserves are meant to be made and eaten within a week or so; they are not preserved, so will not keep.

These preserves also taste great with one of our new favorite breads, from 101 Cookbooks.  I have made several of her bread recipes, and we have loved them all.

easy_little_bread_recipe 1000Photo from 101 Cookbooks

Easy Little Bread
from 101 Cookbooks
1 1/4 cups / 300 ml warm water (105-115F)
2 teaspoons active dry yeast (one packet)
1 tablespoon runny honey
1 cup / 4.5 oz / 125 g unbleached all-purpose flour
1 cup / 5 oz / 140 g whole wheat flour
1 cup / 3.5 oz / 100 g rolled oats (not instant oats)
1 1/2 teaspoons fine grain sea salt
2 tablespoons butter, melted, for brushing

In a medium bowl, sprinkle the yeast onto the warm water and stir until the yeast dissolves. Stir in the honey and set aside for a few minutes, until the yeast blooms and swells a bit – 5 – 10 minutes.

In the meantime, mix the flours, oats, and salt in a large bowl. Add the wet mixture to the dry and stir very well.

Brush an 8-cup loaf pan {9″x5″} generously with some of the melted butter. Turn the dough into the tin, cover with a clean, slightly damp cloth, and set in a warm place for 30 minutes, to rise.

Preheat the oven to 350F / 180C, with a rack in the middle. When ready, bake the bread for 35-40 minutes, until golden and pulling away from the sides of the pan. I finish things up by leaving the bread under the broiler for just a heartbeat – to give the top a bit deeper color. Remove from oven, and turn the bread out of the pan quickly. Let it cool on a rack so it doesn’t steam in the pan. Serve warm, slathered with butter.

Makes 1 loaf.

Adapted from Gran’s Kitchen: Recipes from the Notebooks of Dulcie May Booker.

Prep time: 10 min –    Cook time: 35 min

My Variations of Easy Little Bread {follow the same mixing instructions as the original recipe}

Variation #1:  Oat Rye Bread with Sunflower Seeds

1 1/4 cups / 300 ml warm water (105-115F)
2 teaspoons active dry yeast (one packet)
1 tablespoon runny honey
140 grams whole wheat flour
100 grams oats {not instant}
65 grams dark rye flour
60 grams unbleached white flour
1/2 cup sunflower seeds
1 1/2 teaspoons fine grain sea salt {I used kosher salt}
2 tablespoons butter, melted, for brushing

Variation #2:  Cinnamon Date Bread with Walnuts

1 1/4 cups / 300 ml warm water (105-115F)
2 teaspoons active dry yeast (one packet)
1 tablespoon runny honey
140 grams whole wheat flour
100 grams oats
125 grams unbleached white flour
3 tsp cinnamon
1 1/2 teaspoons fine grain sea salt {I used kosher salt}
2 tablespoons butter, melted, for brushing
5 dates, snipped into small pieces

Have you added any delicious cultured foods to your meals?  If so, which ones?

If you are in Maui, you may want to visit the Upcountry Farmer’s Market.  They sell many different kinds of cultured foods there.

Additional Reading:
http://michaelpollan.com/articles-archive/some-of-my-best-friends-are-germs/

Cultures for Health

The Art of Fermentation by Sandor Katz

Video of Sandor Katz talking about fermented foods

Cooked: A Natural History of Transformation by Michael Pollan

Bon appetit!


4 Comments

A Favorite Lunch

Did you know. . .
. . . that sardines packed in their own oil or extra virgin olive oil are full of good for you omega-3 fats?  It is thought that just 1/2 gram of these fats can significantly reduce your risk of cardiovascular disease.  Avoid sardines packed in vegetable oils, as they are not healthy fats.

Anyone for anchovies?  How about sardines?  I know, I know, these are a couple fish that cause many people to turn up their noses.  Not me though; I love them both.  My intention was to write only about sardines, but I figured as long as we are on the subject of unpopular fishes, I may as well tell you how we like to eat anchovies.  Perhaps our way of eating anchovies will work for you as well, that is, if you want to give them a try.

Once upon a time, I too was among the myriad of folks who did not care for anchovies, as was my husband.  One rainy evening, we were eating pizza at Tony’s Pizza & Italian Restaurant, a favorite Italian restaurant of ours in Bremerton, WA.  That is the night we learned how to eat anchovies.  The secret to liking/loving anchovies on your pizza, according to our waitress, is to order them on the side.  Wow, that really makes a difference!  The salty, fishy flavor permeates the pizza if you bake the anchovies on the pizza, but if you have a little plate of anchovies on the side, it tastes pretty good.  You get an occasional salty punch from the little bits of anchovy.  We have happily eaten anchovies on our pizza ever since!

I have been eating sardines for as long as I can remember.  We had tins of sardines in our pantry when I was growing up, and I admit that even though I ate them, I thought they looked kind of gross.  My recollection is that they were not like the nice sardine filets that we eat now, which are every bit as nice looking as a beautiful piece of fresh salmon {except they aren’t pretty pink}.

Wild Planet Sardines

One of my favorite quick lunches is a “fish cracker” and a salad.  And no, by “fish cracker,” I am not referring to those fishy-shaped crackers that you are probably familiar with. . .the ones with no redeeming nutritional value.  My idea of a “fish cracker” is a Ryvita cracker with a plump, meaty and delicious sardine on top.  Of course, there are additional toppings to make it extra tasty.  This is a favorite lunch of mine because it is quick, tasty and super healthy.

This slideshow requires JavaScript.

I understand if you don’t like anchovies, and don’t want to give them a second {first} chance.  But if you like fish, and haven’t gotten into sardines, I highly recommend them.  The health benefits of sardines {& anchovies} are many:

  • They are low on the marine food chain, so toxins like mercury do not accumulate in them.
  • Anchovies and sardines are chock full of healthy omega-3 fats, which impact mood, circulation, glucose, insulin metabolism, blood pressure and heart health.
  • In particular, sardines are high in protein, B vitamins, selenium, calcium, iron, magnesium, phosphorus, potassium, zinc, copper and manganese.  Talk about a powerhouse of nutrition in one little can!  They are my idea of a great “fast food!”

Sources:

The 150 Healthiest Foods on Earth, Jonny Bowden, Ph.D., C.N.S.

The Perricone Promise, Nicholas Perricone, M.D.

A simple salad of arugula {aka “rocket”} and thinly sliced onions, dressed with fresh lemon juice, extra virgin olive oil, freshly ground salt and pepper, goes well with fish crackers.  It’s one of our favorite salads.

Arugula Salad with Onion and Lemon Vinaigrette

Arugula Salad with Onion and Lemon Juice & Extra Virgin Olive Oil


3 Comments

“Cheese – milk’s leap toward immortality.”  Clifton Fadiman

Before we get to tonight’s dinner, these quesadillas, I have some lovely flower pictures from today’s walk to share with you.


And now for the quesadillas!

quesadilla on plate

There are quesadillas, and then there are quesadillas worth eating.  If you would like a quesadilla that is more than a white flour tortilla filled with melted cheese, then keep reading.

Our quesadillas are filled with cooked spinach or Swiss chard {a lot of it}, roasted peppers & cheese.

We love quesadillas and have been tweaking our current recipe for over 5 years, and think they are now just about perfect.  There have been several versions of this recipe, each change making an improvement on an already good thing.  It is our favorite meal to cook, and one we make weekly.  This is truly a “team meal” for us.  I prep everything and my husband does the cooking.  While he is cooking, I clean everything up so that we only have 2 plates to wash when we’re finished eating.  We are a well-oiled machine when it comes to making quesadillas!

Before I get into the details of how to make these scrumptious quesadillas, I should tell you about the tortillas we use.  We eat food that is good for us {at least 95% of the time}, so it was important to find tortillas that are healthy and taste good.  Often times, breads that are healthy taste like cardboard, or if you’re lucky, hay.

Perhaps you have had the unfortunate experience of buying tortillas for a recipe, and then having them go moldy in the refrigerator.  These are the tortillas that we like & here is how we take care of them so they are ready when we want a quesadilla or a wrap.

Fresh Tortillas in Bag  These are tasty tortillas that we can feel good about eating!

blog freezing tortillas  Stagger your tortillas on a cookie sheet & freeze.  They will curl a little, but you can easily put them bag into the bag you bought them in.  They won’t stick together like they would if you just put the whole bag in the freezer.  I used to separate them with a piece of wax paper; totally unnecessary!  When you are ready to use them, put them on a plate, and flip them a few times while they thaw, so that they aren’t as curled.

This slideshow requires JavaScript.

Quesadillas with Spinach {or Swiss chard} & Roasted Peppers

This is more of a guideline than a specific recipe, as far as amounts are concerned.  Feel free to adjust quantities & ingredients to your liking!

2 large whole grain tortillas

2 quarts raw spinach or Swiss chard, washed carefully and thoroughly dried, then cut into strips {I mince the stems & sauté them with onions, jalapenos & garlic}

Peppers, cut so that they are in relatively flat pieces {bell peppers, poblanos or Anaheims are all great here}; we use 1 bell pepper, or about 3 smaller size peppers

1/2 small onion, finely diced

1 jalapeno, finely diced {add more or less depending on how much heat you like}; or you can use dried red pepper flakes, Serrano peppers, etc.

3 cloves garlic, minced & allowed to sit for 10 minutes {to achieve the health benefits}

Approximately 4 ounces of cheese, thinly sliced {we like Gruyere because it is a delicious low fat cheese that melts well}

The most time consuming part of this recipe is the prep; once everything is sliced and diced you are ready to put your quesadillas together.

Spray a large pan with pan spray, and then add a film of olive oil.  Sauté the peppers over medium heat, until they have a bit of color and are beginning to get tender.  They do not have to be completely tender.  Remove peppers to a plate lined with a paper towel, and blot to absorb any extra oil.

In the same pan, sauté the onion, jalapeno, garlic and stems over medium heat until almost tender. Add the leaves and toss everything together for about a minute, or until leaves are just wilted.  Remove from the heat.  The leaves should be glossy, dark green and gorgeous.

You are now ready to put your quesadillas together!

Place tortilla on a dinner plate.  On half the tortilla, place the cheese, top with peppers and then the greens. Spray a skillet {we use cast iron} with pan spray and then film with olive oil.  Fold the tortilla in half and put in the skillet preheated to medium to medium-low.  The objective is to crisp the tortilla, heat everything through, melding the cheese with the greens and peppers, without burning the tortilla.  Flip the quesadillas several times;  if you flip one, flip the other.  My husband, the quesadilla cook, said he flips them at least 3 or 4 times.  Adjust the heat so that they do not brown too quickly on one side.  Serve them with the cheese on top, so gravity can draw it down through the greens and peppers.

Cut into thirds or fourths & eat immediately.  I cut the quesadillas with my kitchen shears, cutting through the top tortilla first, and then cut the bottom tortilla with the filling; this ensures the filling not squishing out when you cut them.  We eat ours with Tapatio Hot Sauce {a lot of it!}, and sometimes with a little sour cream or plain yogurt {ok, I sometimes put plain yogurt on mine}.

Notes:
My husband says that a nice glass of red wine is really nice while you are cooking these, and I concur!
* We tried soft goat cheese in these, but weren’t crazy with the results.  We love goat cheese, but not here.
* Go easy on the oil-you don’t want your quesadillas to be greasy.
* Be sure your greens are thoroughly dry, so that they aren’t too wet {soggy quesadillas not great}
* Use a sturdy tortilla.  We tried brown rice tortillas, and while they were super tasty, they cracked right down the middle when we folded them.
* The first time you make these, you may want to make a thinner quesadilla, for ease in turning.  They can be a bit tricky to turn over.
* Jarred roasted peppers are fine!  Before we moved to Maui, we used the jarred piquillo peppers from Trader Joe’s.
* I LOVE a good mouth burn, and usually get one with these quesadillas.  But if you don’t, leave out the hot peppers, simple as that.
* If your quesadilla is a little spicier than you like, sour cream or plain yogurt cools it off very nicely.

Bon appetit!


6 Comments

In honor of Julia Child, who would be 101 years of age on 15 August 2013. . .
. . .”This is my invariable advice to people: Learn how to cook- try new recipes, learn from your mistakes, be fearless, and above all have fun!”  Julia Child My Life in France 

There was some beautiful produce plus one unusual {at least for us} item at the farmers market today.

This slideshow requires JavaScript.

After work last Tuesday, we received an invitation to Kamaole 3 Beach Park for a sunset BBQ on Wednesday.  “Yes! Yes! Yes!” was the reply to the invite.  We jump at any opportunity to have a sunset beach BBQ; good friends, good food & gorgeous scenery is only a 40 minute drive away.  I made this chocolate cake to share.  The cake is delicious & quick & easy to make.  It’s not a fancy cake, but then I’m not a fancy baker.  Decorated cakes are lovely, but I am not big on decorating my cakes.

Chocolate Sheet Cake

Chocolate Sheet Cake adapted from In the Sweet Kitchen: the Definitive Baker’s Companion

Cake:
3 c flour {I use whole wheat pastry flour}
1 3/4 c sugar
1/2 c natural unsweetened cocoa powder, such as Ghiradelli or Hershey’s
2 t baking soda
1 t salt
12 T vegetable oil
2 T white vinegar
2 t vanilla
2 c cool water

Preheat oven to 350 degrees.  Add flour, sugar, cocoa, baking soda & salt to an ungreased 9”x11” baking dish.  Stir well to mix.  With the back of a spoon, make three indentations or wells in the dry mixture: one large, one medium & one small.  Into the large well, pour the vegetable oil.  Into the medium well, pour the vinegar.  Into the small well, pour the vanilla.  Pour the water over everything.  With a fork, stir the mixture until the ingredients are well-blended, making sure you reach the corners & sides to catch any dry pockets.  Do not beat this batter, but mix just until most of the lumps are smoothed out, & there are no little patches of overly thick or runny batter.  A few lumps won’t hurt, & it’s important not to overbeat at this point.

Bake for 35-40” {I always start checking at 28” so as not to overbake} or until a toothpick comes out with a few moist crumbs & the top feels springy when lightly touched.  Cool completely on a wire rack before turning out, frosting or cutting.

Frosting:
1/2 c cocoa powder
2 2/3 c powdered sugar
6T butter
4-5 T milk or water {I always use milk, or cream if I happen to have some}
1 t vanilla
Pinch of salt {brings out the chocolate flavor}

Whisk cocoa, powdered sugar & salt together. Cream butter & add powdered sugar alternately with milk.  I don’t necessarily follow the recipe exactly as far as the milk goes, but just add enough milk to get the consistency I want {I like it soft-not runny & certainly not stiff}.  Spread on cooled cake.

Pita Breads

We went to another sunset BBQ last night, but we were in someone’s condo, not at the beach.  Two of the ladies who were at the first BBQ are visiting from the Mainland, and invited us over for dinner.  I decided to make hummus {post to follow on another day} to be eaten with homemade pita bread.  I’ve made pita bread a few times and it was always tasty, but the pockets didn’t always form.  I tried a new recipe, and it worked great!  I will definitely use it again.  I used half whole wheat flour and half bread flour.  It is from The Fresh Loaf website, where there are many recipes that I will be trying.

Borscht

We love eating soup & I enjoy making soups; most of the soups I make are vegetarian.  Today I made borscht.  I’ve made it before and have wanted to make it again; I finally got to it today.  It was great for lunch.

Russian Cabbage Borscht adapted from Moosewood Cookbook by Mollie Katzen.

1 ½ cups thinly sliced potato
1 cup thinly sliced beets
4 cups water or stock

Put potatoes, beets and water in a medium saucepan and cook until everything is tender {save the water}.

2 tbsp butter
1 ½ cups chopped onion
1 scant tsp caraway seeds
1 ½ tsp salt
1 large sliced carrot
1 stalk chopped celery
3 cups chopped green cabbage
Optional: 1 tbsp raisins
Black pepper, preferably freshly ground
¼ tsp dried dill weed
1 tbsp + 1 tsp apple cider vinegar
1 tbsp + 1 tsp honey
1 cup tomato puree {I pulsed a 14 1/2 oz. can of tomatoes in my food processor}

Melt the butter in a large soup pot and add the onions, caraway seeds and salt.  Cook until onion is translucent, and then add carrots, celery and cabbage.  Add the cooking water from the beets & potatoes, and cook, covered, until all the vegetables are tender.  Add potatoes, beets and all remaining ingredients.

Cover and simmer slowly for at least 30 minutes.  Taste and correct seasonings.

Serve topped with sour cream or plain yogurt, extra dill weed and chopped fresh tomatoes.

Note: The next time I make this soup, I am going to chop the beets and potatoes instead of slicing them.

Take some time to prepare & enjoy delicious food.

Bon appetit!


Leave a comment

Waiting for Flossie

We don’t get a lot of rain where we live in Pukalani, so today’s rain was welcome. The morning sky was a mix of blue, gray clouds & sun breaks; the wind was soft. Big winds are a frequent occurrence in Pukalani, winds so big it’s a wonder that plants have any foliage & that any of us have a hair left on our heads. But they aren’t the sustained winds that come with a storm. We are waiting for Flossie, the Tropical Storm that is currently headed for Maui, to arrive. Right now, the rain is falling a little harder & the palm fronds are swaying gently. A few birds are chirping here & there, but we aren’t hearing the usual afternoon bird symphony of chirps & tweets. We hear an occasional cock-a-doodle-doo from a neighborhood chicken.

We spent the morning preparing for Flossie. The smart thing to do if you think you may lose power is to make some food so you are ready if it happens. Having lived in the Pacific Northwest for over 20 years, we are experts at getting ready for a power outage; we experienced many. A big difference is that when the power goes out on Maui, it isn’t freezing cold outside. We have plenty to eat, so I just prepared a few things to make our day just a little tastier. I made cornbread using Bob’s Red Mill Blue Cornmeal, which I hear is more nutritious than yellow cornmeal, these oatmeal muffins and Passato of Vegetables , one of our favorite soups {good hot or cold}. Today is cool enough to enjoy the soup hot, and warm enough to eat it cold, should we be sans power. Fingers crossed that the power stays on!

Blue Cornbread {adapted from Moosewood Cookbook}
1/4 cup honey
1/4 cup melted unsalted butter
1 cup buttermilk
1 large egg
1 cup blue cornmeal {of course you can use yellow}
1 cup whole wheat pastry flour
2 tsp baking powder
1/2 tsp baking soda
1/2 tsp kosher salt

Whisk together honey, buttermilk, egg & butter. In a large bowl, whisk together the dry ingredients. Add wet ingredients to dry & mix well.

Bake in a greased 8″x 8″ pan at 425 degrees for 18 minutes or until toothpick comes out with a few moist crumbs. I love it with butter & molasses.

Blue Cornbread

More rain has arrived, along with thunder! And now there is lightning! Time for hot soup.

Life is too short to eat mediocre bread, and there is a lot of it out there.

4 Comments

Bread baked and cut final

One of life’s great pleasures is the aroma of yeasty bread dough in the oven, transforming itself into a beautiful, delectable, crusty loaf of bread.  If you have never baked homemade yeast bread, you are in for a treat.  It really doesn’t take a lot of time; you can have delicious bread from start to finish in 3 hours or less, depending on the bread.  Much of that time is rising time, so you can be doing something else, like making soup or salad to accompany your freshly baked bread.

It isn’t just the smell that is enticing though.  Bread dough feels good in your hands.  Not so much at the beginning, when it is a sticky, shaggy mass of dough…

Rough shaggy dough final

but when your mindful kneading transforms it into a silky, supple ball of dough, it is a pleasure to behold.  I find kneading bread to be therapeutic and calming.

Kneaded bread final

I have been making yeast breads by hand for many years, although I am certainly not an expert on the subject.  I will say that I am not a fan of bread machines.  Perhaps I had a bad experience with one.  My mother-in-law had a bread machine when they first came out, and she made some tasty breads.  She enjoyed hers so much that she gave one to us.  I used it a few times.  It was nice to wake up to freshly baked bread courtesy of the bread machine, but it had a hole in the middle of the cylindrical loaf.  I could live with that, but the outside of the bread was slightly burned when the inside was undercooked.  So I decided to try letting the bread machine do the kneading, and I would bake off the loaf the “old fashioned” way.  Doing that deprived me of the pleasure of getting my hands into the dough and experiencing that lovely change in texture from rough to silky smooth.  Bread machine?? Not for me, thank you very much!  I gave ours away to an appreciative uncle.

This slideshow requires JavaScript.

Whole Wheat Rye Potato Bread

1 medium sized potato
reserved potato cooking water
2 packages dry yeast
2 tbsp butter, cut into small chunks
2 tbsp honey
1 tbsp kosher salt
1 cup warm milk {low fat is fine}
3-4 cups whole wheat flour
2 cups dark rye flour
3 tbsp coarse cornmeal + 3 tbsp ground flax seeds + whole wheat flour to make 1 cup
3tbsp caraway seeds {or fennel, anise or a combination of them}

Peel & dice the potato.  Cover with water & boil until potato is tender, about 15-20 minutes.  Save 1 cup of the potato water {add hot tap water if you do not have enough}.  Mash the potato & set aside.

In a large bowl, mix together 3 cups whole wheat flour, rye flour & cornmeal/flax seeds/whole wheat flour mixture.  Keep the additional cup of whole wheat flour in case you need to use it.

Pour the {not too hot} potato water in another large bowl, then sprinkle in the yeast & stir with a wooden spoon.  Add the butter, honey, caraway seeds and salt, and then stir in the mashed potato {approximately 1 cup}, warm milk & 3 cups of flour mixture.  When you add the yeast to the warm potato water, it will begin to activate.  It will begin to get bubbly as you add the remaining ingredients & will look like this. . .

Bubbly yeast final

Beat until smooth, and then add enough additional flour to make a stiff dough.  When it gets hard to incorporate any more flour with the spoon, turn the dough out on a lightly floured counter.  Knead the dough until smooth and elastic, about 8-10 minutes.  Wash the bowl in which you mixed the dough, butter it and then place the dough back in the bowl, turning to coat all sides with butter.  Cover with a clean kitchen towel & let rise in a warm place until doubled in bulk.  This should take 45-60 minutes.  I like to turn on the oven for 2 minutes, turn it off and then put my bowl of dough in the toasty warm oven to rise.  Don’t forget to turn off the oven or you will bake your bread prematurely!  I have heard that the pilot light in a gas oven has enough warmth to be a good place to let bread rise, but I have never had a gas oven, so can’t vouch for that one.

How do you know when your dough has doubled in bulk?  It is difficult to “eyeball it” so there is a little test you can use.  Poke 2 fingers into your dough after it has risen for 45 minutes; if the indentations remain, your dough is ready for the next step.  If not, cover it back up for 15 more minutes & repeat the test.

Indentation test to see if dough is finished rising final

When doubled, punch the dough down, cover and let rise again in a warm spot for 20 minutes.

Turn the dough out onto a lightly floured counter & knead for 1-2 minutes.

Now you are ready to shape your loaves!  Divide the dough into 2 equal pieces {I use my kitchen scale to do this} & shape.  You can either sculpt the dough into a loaf with your hands, or you can do it jelly roll style, as shown in the slideshow {right before the recipe}.

Note about yeast:  When you are adding warm liquids to yeast, make sure the temperature of the liquid is between 100 & 115 degrees Fahrenheit.  If your liquid is too hot, you risk killing the yeast & your bread will not rise.  Be sure to check the expiration date on your yeast to verify that it is not outdated.  It may still work. . .or it may not.

Enjoy the kinesthetic, aromatic & flavorful joys of baking your own yeast bread. . .and don’t forget the butter!