“One of the very nicest things about life is the way we must regularly stop whatever it is we are doing and devote our attention to eating.” Luciano Pavarotti
Why should you bother making homemade almond milk? Because it doesn’t contain any of the additives or weird ingredients found in packaged almond milk & is delicious, healthy & simple to make. A regular blender can be used to whip up this luscious milk, so what are you waiting for?
I’ve been following Gena Hamshaw’s fabulous blog called Choosing Raw-Vegan & Raw Recipes {even though I am not vegan, nor do I adhere to a raw diet}, and have been contemplating making homemade almond milk for some time. I finally took the plunge & made 2 batches & am thrilled with the results! The only ingredients needed to prepare this delicious vanilla almond milk are almonds, water, agave nectar & vanilla. The first batch was served up unstrained, in all its textural {read fibrous} glory-it was very tasty but I decided to strain the second batch & I am glad I did. The resulting milk was smooth, creamy & delicious. I used cheesecloth, because I always have cheesecloth on hand. A nutmilk bag is probably in my future though, because it can be washed & reused. So far, the only thing I’ve used my almond milk for was chocolate milk, using Dagoba Unsweetened Cacao with Bits of Unsweetened Chocolate-very tasty!
“In 1911, Henry Ginaca invented the Ginaca machine that could peel and core 35 pineapples per minute, making canned pineapple much easier to produce. Before this, each pineapple had to be peeled and cored by hand. Because of this invention, Dole’s pineapple canning business exploded and other pineapple canneries soon adopted the machine.” {Eat This! http://www.healthdiaries.com/eatthis/20-facts-about-pineapples.html}
If you have ever been perplexed about how to deal with a whole fresh pineapple, just follow the pictures below. You won’t be able to do 35 pineapples per minute, like the Ginaca machine, but in less than 10 minutes, you can have a delicious pineapple cut & ready to eat, or use for smoothies, margaritas, pancakes, yogurt, ice cream topping or whatever you fancy. If you have a dehydrator, fresh pineapple is delicious when cut into pieces & dried. No sugar is required before drying, so it is less sweet than commercially dried pineapple, which I have seen crusted in sugar.
If you can get them, I highly recommend Maui Gold Pineapples, not because I live on Maui, but because they are lower in acid & are tastier. Try pineapple sprinkled with a little sea salt-it complements the sweet-tart flavor of the fruit.
Why eat pineapple? Here are a few reasons, from The 150 Healthiest Foods on Earth {Jonny Bowden, Ph.D., C.N.S.}:
* 1 cup cubed fresh fruit has almost 100% of the Daily Value of manganese, which is a trace mineral required for healthy skin.
* Pineapple has a good amount of vitamin C, plus some other vitamins & minerals.
* 1 cup fruit has about 2 grams of fiber
* Pineapple’s glycemic load {the impact of a food on your blood sugar} is relatively low.
* It tastes great!
“There is no snooze button on a cat who wants breakfast” Anonymous
This is so true! Jack has all kinds of tricks to wake us up when he thinks it is time for him to eat his breakfast. He’s just like Simon’s Cat.
It’s late, so this is going to be short. Breakfast is important because if you think about it, when you wake up, you probably haven’t had any food for 10 hours or so; it’s time to nourish your body. We had a simple, but tasty breakfast this morning. Rye toast topped with my husband Gerald’s eggs fried in a little coconut oil and pasture butter, broccolini with a bit of home made mayonnaise and a beautiful mango with freshly ground salt and pepper. And tea, of course!
“You don’t have to cook fancy or complicated masterpieces – just good food from fresh ingredients.” Julia Child
I left early for my walk this morning, though not as early as I should have. I departed at 7:30, but the sun felt sizzling hot, just like it did yesterday, although today there was a nice cloud that stole the sizzle every now and then; I like that on a hot day. The difference from yesterday’s walk is I left 3 hours earlier today, and yesterday’s walk ended up at the community swimming pool, while today’s walk ended up in the kitchen. For me, both are excellent destinations. Following is a run-down of my kitchen adventures with recipes.
Upon returning from my 3.4 mile walk, I made some freezy Banana Mocha Frozen Yogurt with Crunchy Walnuts, satisfying & scrumptious. Did I mention that it’s hot today? This little snack really hit the spot & helped me to cool off. It’s not super frozen, but more of a soft serve that tastes enough like ice cream to satisfy me. You can put it in the freezer if you want it firmer. If you leave it in the freezer until it freezes solid, you can bring it back to creaminess by whizzing it in the food processor again. I find it easier to just make it and eat it right away, or within an hour or two. My recipe is an adaptation of a tasty vegan Banana Soft Serve; find that recipe here. After you look at the Banana Soft Serve recipe, take a spin around the Choosing Raw blog; Gena has lots of fabulous recipes. You do not need to be vegan or vegetarian to enjoy her site.
Banana Mocha Frozen Yogurt with Crunchy Walnuts ¾ cup plain, unsweetened yogurt {We use Nancy’s Plain Yogurt in the 64 ounce container. Our yogurt is nonfat or low fat, whichever one has the latest pull date.}
1 ½ frozen bananas cut into small pieces {When our bananas are getting too ripe, we peel them, cut them in half and freeze them on a cookie sheet. Pop them into a freezer bag, and they are ready for banana bread, banana muffins, smoothies, “frozen yogurt” and whatever else you might fancy.}
1 tsp cocoa powder {like Hershey’s}
¼ tsp espresso powder
Grind or pinch of sea salt {brings out the flavor}
20 chocolate chips {preferably dark chocolate, because it’s healthier}
Put the yogurt, cocoa powder, espresso powder and salt in a food processor or high speed blender. I have a little Cuisinart mini food processor that works great. Pulse a few times to mix. Add chocolate chips and ½ a banana and pulse to get things going. Once the first banana is blended in, you can add the rest of the banana pieces and process until smooth. Top with crunchy walnuts or your nut of choice and enjoy.
I do not put any sweetener in this recipe, because the bananas are sweet enough for our tastes. We have been eating plain yogurt for a long time, and find the sweetened stuff way too sweet. If you need sweetening, try a little maple syrup or honey.
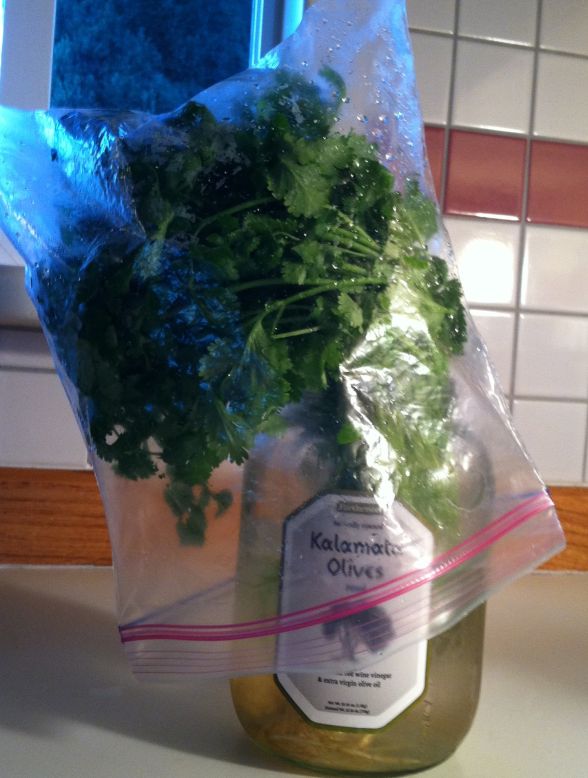
The cilantro is washed & happy in its jar, which was formerly the home of kalamata olives.
Dandelion greens {a new favorite of ours} have been cleaned and are ready for salad with mustard vinaigrette. This is my gateway recipe for mustard vinaigrette, from A Homemade Life, by Molly Wizenberg. I love this book, and her blog Orangette. I highly recommend that you stop by when you have a minute; you will be happy you did. She tells great stories and her recipes are wonderful.
Mustard Vinaigrette {from A Homemade Life}
In a small bowl, whisk together 2 tbsp Dijon mustard and 1 tbsp + 2tsp red wine vinegar. Add 3 tbsp olive oil & whisk well to emulsify {thicken}.
I actually just wing making mustard vinaigrette now; I start with a big plop of Dijon {smooth or grainy}, minced shallot, garlic {mashed to a paste with a little kosher salt} & vinegar of choice {I use Bragg’s apple cider vinegar or red wine vinegar, and occasionally I will use balsamic with a squeeze of lemon.}. Whisk together to combine and then whisk in olive oil until it is the consistency you like. If it is too sharp for your taste, add a little honey.
I steamed some asparagus, which we enjoyed with a dollop of freshly made mayonnaise, freshly ground salt & pepper.
Mayonnaise {adapted from The Best Recipeby Cook’s Illustrated}
1 egg {pasteurized if you are worried about eating raw egg}
2 tsp white wine vinegar
5 tsp freshly squeezed lemon juice {original recipe is 3 tsp}
about 2 tsp Dijon mustard {I don’t measure, but just put in a nice plop; original recipe is ½ tsp}
½ tsp salt
1 ½ cups neutral oil {I use canola}
Put egg, vinegar, lemon juice and salt in bowl of food processor. Pulse a few times to mix. Turn on the processor and drizzle in oil, until all of it has been added. My Cuisinart’s feed tube has a hole in it, so I just fill it with oil until it’s all in, and then turn off the processor. I don’t like the mayonnaise to be super stiff, so I turn off the processor as soon as all the oil is in.
There was a bit of broccoli, not your “regular” broccoli, but something like broccoli rabe, leftover in the refrigerator, so we ate it in the same way as the asparagus. Delicious!
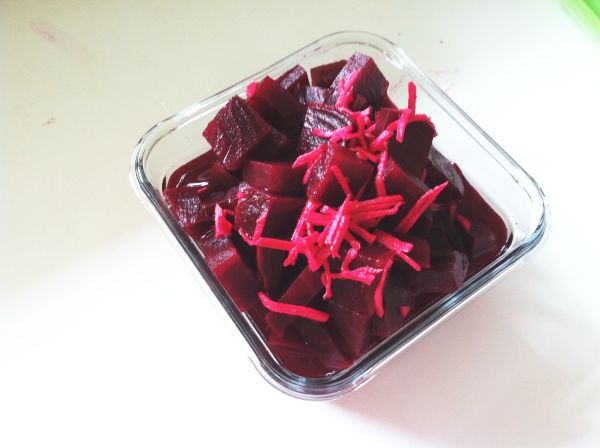
The beets are tender now, from their time in the steamer. Not sure if I will get to it today, but I am going to make Beet Namasu. This is our new favorite way to enjoy pickled beets.
P.S. I did not get to making Beet Namasu. We went out for pizza & beer at Flatbread Pizza Company in Paia. Oh well, tomorrow is another day.
This is the reason I weigh close to 20 pounds; I lounge about most of the day!
“The ripest peach is highest on the tree.” James Whitcomb Riley
Independence Day sunset at Kamaole III Beach Park Kihei. Hope you had a great 4th! In Maui, it pretty much feels like summer all year round; we do not have to “earn” our summer, like our friends and family in the Pacific Northwest, it’s just here for us to relish. Sometimes I have to think about what time of year it is, because we don’t have the distinct seasonal changes. Flowers flourish freely, as if without effort. Fresh produce is plentiful and available whenever one wants to indulge.
I was delighted to see flats of peaches in the store the other day. I knew just what we would do with them-make peach preserves. Actually, what we make is more like a cross between peach preserves and peach sauce. Lest you think that I was going to heat up the kitchen with a pot of golden peaches bubbling away in sugary syrup, and a boiling water canner to safely preserve them, let me set the record straight. First of all, my husband is the chief preserve maker in our house. I may assist with determining doneness, or deciding if it needs a little thickener, but he is always the one that says, “Let’s make preserves!”
When we moved to Washington State, in 1988, I became a Master Food Preserver {now called Food Safety Advisor} through the County Extension Office. I learned the myriad ways of preserving food safely, and did quite a bit of preserving when we had a large garden and the time required to do it. Now, we make delicious preserves quickly and easily, in about 30 minutes. Not only are they delicious, they are healthier because you can make them with far less sugar. The only downside of preserves made this way is that they are not keepers; they need to be eaten within a week’s time.
Homemade Peach Preserves 1 quart peaches, cut into eighths {you can leave the skins on!}
1 tbsp sugar, more or less to taste
Juice from ½ a lemon, about 2 tbsp, to taste
Pinch salt, preferably sea salt
Put the peaches, sugar, lemon juice & salt in saucepan. Cook over medium low heat until it comes to a boil. When mixture boils, turn the heat down to low so you have a slow bubble. The objective is to “cook off” the water, so that the mixture thickens and becomes syrupy.
Do not cover the pan, or the water will not be able to evaporate. You want to preserve the fresh, bright flavor of the peaches, so if you cook them too long, they will taste “brown.” When the mixture has thickened, and tastes good to you, it is done. You can leave the mixture as is, or mash is with a fork to break up the larger pieces of fruit. The preserves will be thinner than store bought or traditionally prepared preserves, so if you want them to be thicker, add a cornstarch slurry {mix 2 tsp cornstarch to 2 tsp water} to thicken them up. They will thicken up a bit when they are refrigerated.
You can make preserves this way with most fruits, but be aware that each fruit differs in the amount of water and pectin, so preserves will cook up differently.
Enjoy your preserves with toast, in plain yogurt {who needs that presweetened yogurt??} or any other way you like. I have a fantastic banana muffin recipe I’ll be sharing soon that would be fantastic with some salted butter & peach preserves. Yum!
One more thing. . .
. . .you may not want to use up your whole flat of peaches for preserves. Here is what we do with them-we cut them in eighths, then put them on a cookie sheet lined with parchment or waxed paper {they will stick to the cookie sheet and be hard to remove if you don’t line it}.
Pop in the freezer until they are frozen, then bag them up. We got 2 gallons of frozen peaches from 16 peaches, so we will be enjoying sunny peach preserves in January!
“There are five elements: earth, air, fire, water and garlic.” Louis Diat
Did you know. . .
……… that garlic, also known as “stinking rose” has some great health benefits, if you prepare it correctly? If you don’t, you have tasty food, but most of the health benefits are lost. If you are going to cook the garlic, just a minor adjustment is required to preserve the benefits. You’ve probably heard of letting meat “rest” before you cut it. It’s the same thing for garlic, except the garlic rests before you cook it. Prep the garlic for your dish, and then let it hang out away from heat for at least 10 minutes. While it is resting, amazing things happen, and that is what makes garlic so good for you.
For inquiring minds who want to know, here is the science behind garlic’s health benefits. Raw garlic contains the 2 ingredients that are required to make allicin, which is the compound that makes garlic so healthy. These 2 components, alliinase and alliin, comingle when you crush, chew or mince the garlic, and then make allicin. If you heat the garlic immediately after cutting it, the heat-sensitive enzyme alliinase is destroyed, and thus no allicin will be created. Health benefits go up in smoke!
What are some of the health benefits of garlic? I could write pages on this, but will just refer you to a few resources instead. Here’s a list of some things that are good about garlic:
helps neutralize bacteria and viruses
inhibits growth of cancerous tumors and reduces the risk of certain cancers, particularly stomach cancers
reduces risk of blood clots
fights free radicals, inflammation and inflammatory conditions such as allergies
lowers blood pressure
Sources of information:
A favorite recipe of mine that uses garlic comes from The Garlic Lovers’ Cookbook {1980 The Gilroy Garlic Festival Association, Inc.}. The recipe was a recipe contest entry by Julie and Gary Crites. If you like Boursin Cheese, you will love this!
Creamy Garlic Herb Cheese
2 8-oz. packages cream cheese
1 pint sour cream
½ cup butter
3 cloves garlic, pressed
¼ cup snipped fresh chives
Mix all ingredients in blender or food processor. Chill in refrigerator for several hours. Warm to room temperature before serving with crackers or as a dip for fresh vegetables.
This is what we had for breakfast this morning, and it was quite tasty. There are those who have to eat “breakfast food” for breakfast, but here at our house, we eat most anything that tastes good and is good for you. Sometimes we like to start the day with a salad, to get a jump start on the day’s vegetables. You may remember from my Saturday is Market Daypost that we stock up on lots of fruits and vegetables on Saturdays, and it can be a challenge to eat them all in a week.
The salad included red leaf lettuce, super thinly sliced onion, creamy avocado, cherry tomatoes, freshly made hard cooked eggs, dried plums, cilantro, freshly grated ginger, hemp seeds and lilikoi. I dressed it with freshly ground salt & pepper, champagne vinegar & extra virgin olive oil. The produce & eggs all came from local farms. We also enjoyed toast made from Whole Wheat Seeded Sourdough Bread from the Moana Bakery and Cafe located in Paia, topped with the herb butter I made the other day. Green tea washed it all down. Delectable!
About the lilikoi. . .I was always planning to make a lilikoi vinaigrette, but I once saw someone cut a lilikoi in half and squeeze the contents onto her cottage cheese. So I decided that squeezing the contents right on top of the salad and then putting dressing on was probably just as good, and it is. We eat it all, including the seeds. Of course, you can always strain them out if you don’t want the added crunch. Everytime I eat lilikoi, the taste and smell take me right back to the Radford High School {Oahu} locker room, where we had a vending machine with canned juices. After every P.E. class, I would always buy a Passion Orange drink to help me cool off. Taste and smell are powerful senses. Best to have lilikoi trigger that locker room memory than sweaty bodies!
Try a salad for breakfast-it’s a delicious & healthy way to start your day!
Have you been to your local farmer’s market recently? If not, you are missing out on some fabulous fresh food, fresher than your local supermarket produce department can offer, and probably for less money. And it feels good to pay your local farmer directly for the food you enjoy. Super fresh food that’s less expensive. What more could you ask for?
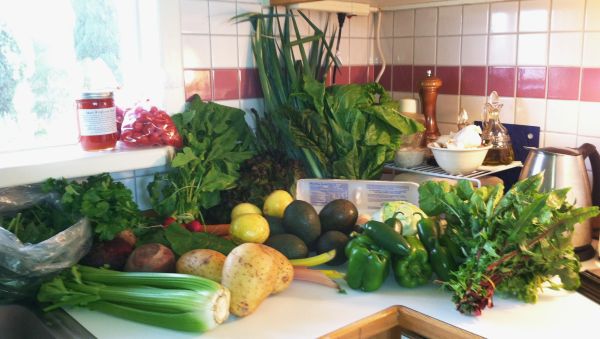
The refrigerator is not quite free of last week’s produce; there is still a little washed arugula & red leaf lettuce, 2 beets which I cooked yesterday, plus a bag of unwashed arugula. I guess we did pretty good getting through most of it. But today is Saturday, and Saturday is Market Day. . .always. I used to go to the Upcountry Farmer’s Market in Pukalani, about 5 minutes from our house, but my husband has taken over that activity. He is willing to leave the house before 6:30 am to get the good spinach & the best of everything else; I am not. If you don’t get there early, someone else buys up all the good spinach and the cilantro. So, I eat breakfast and head out on my morning walk around 7:00 am, and when I return, the dining table is filled with fruits and vegetables for me to prep and find room for in the refrigerator {which can be a challenge!}. Here is a photo of this week’s bounty:
since you can’t really identify everything, here is what we have for this week: eggs, cilantro with roots,
spinach {the good spinach!}, tomatoes, lilikoi {passion fruit}, sugar cane, 8 avocados, celery, 5 carrots, 2 big beets, radishes, red lettuce, 2 bunches arugula, 4 potatoes, 2 bunches Swiss chard, dandelion greens, 4 green peppers, 4 jalapenos, asparagus and 2 bunches green onions. Yikes! That is a lot of food, but this is the way we eat. I will spend a good deal of time this week preparing healthy and delicious meals; my husband and I prepare many of our meals together, and eat most of them together. I know that everyone doesn’t have the time or the inclination to make everything from scratch, but food is my passion: reading about it, writing about it, eating it and preparing it, so I am happy to spend time in the kitchen. Today I made a pickled beet that uses the same dressing as the Japanese cucumber namasu recipe that I have been making for years. I call it Beet Namasu and I must say it tastes pretty good; the fresh ginger really complements the beets’ sweetness. I reduced the sugar from the original recipe, so if you want a sweeter pickle, you can increase the sugar.
Beet Namasu
2 large beets, steamed whole until tender
1 cup white wine vinegar {you can use unseasoned rice vinegar if you like}
2-4 tbsp sugar {I used 2 tbsp}
2 tbsp julienned {cut into fine strips} fresh ginger {do not substitute powdered ginger-it is not the same flavor}
¼ tsp salt
When the beets have cooled, peel them & cut into ½” chunks. Mix the vinegar, sugar, ginger and salt until the sugar dissolves and pour over the beets. Marinate for at least a couple of hours before eating.
Japanese Cucumber Namasu
Recipe from Hawaii Cook Book {1973}
3 cups very thinly sliced cucumbers
½ tsp salt
1 tsp finely chopped ginger {I like a lot more than this!}
½ cup white wine vinegar
2 tbsp sugar
¼ tsp monosodium glutamate {I never use this.}
Partly peel the cucumbers leaving strips of green, and slice very thin. Add salt to cucumbers and let stand for 15 minutes. Combine remaining ingredients. Press excess liquid from cucumbers and add to sauce. Chill and serve as a relish or salad. Sometimes small pieces of thinly sliced mushrooms, carrots or abalone are added to this dish. I always shredded a carrot & put it in for color.
Asparagus is one of the definitive signs that spring is finally here, along with buttery daffodils, sweet peas and fragrant lilacs. I don’t notice the change in seasons so much in Maui. Even though the weather does change discernibly in the spring and fall, it isn’t as striking a change as it is in the Pacific Northwest, where we lived before making the wise decision to move back to the Hawaiian Islands. I’m not aware of daffodils or lilacs growing in Maui, but asparagus makes a springtime appearance at the farmer’s market. When asparagus comes to you directly from the farmer, you have beautiful dark green spears, just waiting to be roasted in a hot oven, steamed and then adorned with freshly made mayonnaise or aioli or made into a silky soup. Before we get to the recipe, let us go back to the title of this post. Would you pack this vegetable in your lunch? I think you know what I’m referring to here-the totally normal malodorous after effects of eating asparagus. You may think that you do not have pungent pee after you eat this springtime delicacy, but in fact you do. However, according to Web MD, only about a quarter of the population has the gene that allows them to detect asparagus’ sulfurous amino acids that break down into smelly chemical components in everyone. People have noticed this phenomenon for centuries. In 1913 French novelist Marcel Proust noted that asparagus “transforms my chamber-pot into a flask of perfume.” A British men’s club is purported to have put up a sign that said, “During the asparagus season, members are requested not to relieve themselves in the hat stand.” I am one of the lucky 25% who has the gene and just in case the person who follows me into the ladies’ room does too, I usually choose to enjoy my asparagus at home. How about you?
Roasted Asparagus with Lemon & Thyme
1 pound asparagus washed & dried, ends trimmed {I snap the stems off at their natural breaking point.}
Extra virgin olive oil
Freshly ground salt & pepper
Fresh thyme sprigs
Thin slices of lemon, halved
Put asparagus on a cookie sheet & drizzle with extra virgin olive oil. Roll the asparagus around so that the spears are filmed with oil. Don’t put too much, or your asparagus will be greasy. Season with salt & pepper, and then distribute thyme sprigs over all. Top with thin slices of lemon. Roast in a 375 degree oven for 7-15 minutes, depending on how thick your asparagus is. I start checking for doneness around 7 minutes. I like the asparagus to be tender, but not so tender that it bends when I pick it up. Be sure to eat the lemon slices with the asparagus {if you have organic you can eat the rind too-it’s good for you}.
“Raisin cookies that look like chocolate chip cookies are the main reason I have trust issues.” Unknown Author
I’ll start by saying that I’m pretty popular when I take these cookies to work, or to a sunset beach BBQ. People seem to like them. . . a lot. I am amazed at how many people screw up their faces when they hear that a sweet treat has salt on it. There is no surprise here. Salty + sweet = something delicious. Case closed. Remember how good a chocolate milkshake and French fries tastes? Indeed, putting the right kind of salt on your cookie can be quite tasty. This recipe is an adaptation of Jules Clancy’s {Stone Soup} adaptation of Molly Wizenburg’s {Orangette} recipe. I have reduced the sugar, changed the flour to whole wheat pastry flour & added walnuts. I have strong feelings about nuts in cookies. In my opinion, no self-respecting chocolate chip cookie goes into the oven without nuts {big pieces please, not finely chopped}. The combination of butter, brown sugar, chocolate and walnuts is one of the tastiest I know. It’s delicious before and after baking, especially with salt; Maldon salt to be exact. The dough itself has no salt; it is all on the outside of the cookies. Big, crunchy flakes of white salt from France. It isn’t inexpensive salt, but a little goes a long way, and it lasts a long time. Whatever you do, please do not use the stuff in the blue box. It will not taste good on your cookies or anything else for that matter. Once you get used to good salt, there is no going back to iodized table salt. This recipe goes together quickly, especially if you use a scale instead of measuring cups, and it’s easy to make all the cookies exactly the same size. Invariably, my balls of dough would vary in size before I started weighing my cookie dough. Bonus: clean-up goes quicker too!
Salted Dark Chocolate Chip Cookies
10 oz. unsalted butter, softened
13 oz. light brown sugar {2 packed cups}
2 eggs
16 oz. whole wheat pastry flour {3 ½ cups + 1 tbsp flour}
1 1/2 teaspoons baking powder
1 1/2 teaspoons baking soda
16 oz. dark chocolate chips or chopped dark chocolate {I use Ghirardelli 60% Cacao Bittersweet Chips}
2 cups broken walnuts
Cream the butter & sugar together until light & creamy. Add eggs & mix until well combined.
Whisk flour, baking powder & baking soda together.
Stir butter mixture into flour just until combined.
Stir in chocolate chips & nuts. Cover & refrigerate at least 15” but no longer than 72 hours. The dough is difficult to work with when it is cold, so I like to make the balls while it’s soft, and then refrigerate it.
Line 2 cookie sheets with parchment & preheat oven to 350 degrees.
Place 1 ½ oz {about golf ball size} balls of dough onto the prepared cookie sheet, allowing room for them to spread. Sprinkle liberally with Maldon salt flakes. {I sprinkle the cookie sheet with salt before putting the dough balls on it.}
I start checking for doneness at 10” and usually bake them about 14”. I declare them done when the outside edges are set & the center is still moist; this will give you a cookie that is crispy on the edge & soft in the middle, just the way I like it. When baking on 2 trays, reverse cookie sheets’ positions halfway through baking. Cool cookies on the tray.
Makes about 24 cookies
Some people like their cookies with milk, but I’ll have mine with a nice cup of tea.
Take a look at that big flake of French salt!
I hope you’ll bake a batch of these cookies for the chocolate chip cookie lovers you know; they will love you for it. And I’m sure you won’t mind either!
“One of the very nicest things about life is the way we must regularly stop whatever it is we are doing and devote our attention to eating.” Luciano Pavarotti
“One of the very nicest things about life is the way we must regularly stop whatever it is we are doing and devote our attention to eating.” Luciano Pavarotti
“One of the very nicest things about life is the way we must regularly stop whatever it is we are doing and devote our attention to eating.” Luciano Pavarotti
“One of the very nicest things about life is the way we must regularly stop whatever it is we are doing and devote our attention to eating.” Luciano Pavarotti
“One of the very nicest things about life is the way we must regularly stop whatever it is we are doing and devote our attention to eating.” Luciano Pavarotti
“One of the very nicest things about life is the way we must regularly stop whatever it is we are doing and devote our attention to eating.” Luciano Pavarotti
“One of the very nicest things about life is the way we must regularly stop whatever it is we are doing and devote our attention to eating.” Luciano Pavarotti
“One of the very nicest things about life is the way we must regularly stop whatever it is we are doing and devote our attention to eating.” Luciano Pavarotti
“One of the very nicest things about life is the way we must regularly stop whatever it is we are doing and devote our attention to eating.” Luciano Pavarotti
“One of the very nicest things about life is the way we must regularly stop whatever it is we are doing and devote our attention to eating.” Luciano Pavarotti

 Photo by Gena Hamshaw from www.choosingraw.com.