“One of the very nicest things about life is the way we must regularly stop whatever it is we are doing and devote our attention to eating.” Luciano Pavarotti
Welcome to Refrigerator Confidential Day #6! The refrigerator is not looking bare, because the bags of produce have been replaced by glass storage containers full of prepared food, which is a good thing. Sometimes it does look bare by the end of the week, but that is only when we manage to eat everything. It’s all good!
Thursday’s Meals with Recipes:
Breakfast
Oatmeal with Granny Smith Apples {recipe & photos on Refrigerator Confidential Day #5}
Green Tea
Freshly Pressed Ginger Kombucha
Lunch Sandwich of Gruyere Cheese & Plenty of Arugula on Whole Grain Bread
Grapefruit Slices
Dinner {Huge} Plate Salad of Mediterranean Flavors with Fresh Oregano Vinaigrette
Sandwich of Gruyere and Plenty of Arugula
Sliced Grapefruit
Sandwich of Gruyere Cheese & Plenty of Arugula on Whole Grain Bread
This is my husband’s creation, and he says that you cannot have too much arugula on this sandwich. It is a very tasty sandwich! Cheese sandwiches were my favorite as a kid, but they were just American cheese and mayonnaise on white bread; not nearly as sophisticated as this sandwich. I imagine most kids would not be too keen on arugula’s bitterness. Bitter greens are good for you, so eat your bitter greens. . .on a cheese sandwich!
2 pieces of your favorite bread {we used Dave’s Killer Bread}
Gruyere cheese, thinly sliced
Arugula. . .lots
Mayonnaise
Salt & freshly ground pepper
Put cheese on 1 piece of bread {as much as you like}. Top with a big pile of arugula & sprinkle with a little salt and freshly ground pepper. Spread mayonnaise on the other slice of bread & close up your sandwich. Cut in a way that makes you happy & eat.
Welcome to Refrigerator Confidential Day #5! We are not running out of food yet, nor ideas for using what’s left. I think we are doing a good job this week getting through most of the produce we bought last Saturday.
Wednesday’s Meals with Recipes:
Breakfast
Oatmeal with Granny Smith Apples
Green Tea
Freshly Pressed Ginger Kombucha
Lunch
Quesadilla with Gruyere, Green Peppers, Jalapeños & Swiss Chard
*1/3 cup regular oatmeal {not instant or quick cooking}
Scant 2/3 cup milk of your choice {or you can use water}
Pinch sea salt
1/2 Granny Smith apple, or other apple variety of your choice, diced small {you can leave the peel on if you wish}
Put the oatmeal, milk, salt and apple in a microwave safe bowl. The bowl should hold 2-3 cups so that the oatmeal doesn’t boil up and over the edge in the microwave. Cook, uncovered, on high for 1 minute, stir, cook for another minute, stir, and then cook for about 1 more minute. Take out and let stand for a few minutes, for the oats to absorb the milk. Top with whatever you like on your oatmeal. I tried roasted peanuts & a small plop of peanut butter & thought it was pretty tasty.
*I use 1/3 cup oatmeal for 1 serving for me. My husband likes a larger serving, so for him I use 1/2 cup oatmeal and a scant 1 cup milk.
Snip any thorns off of the leaves, slice off the top third of the artichoke and trim the stem so the artichoke can stand upright, removing as little as possible from the base. Rinse the artichokes well, pulling the leaves apart to get out any dirt or critters. If they are large, you can cut them in half lengthwise, so they will better fit into your steamer. Rub the cut sides with a lemon to prevent browning.
Put your lovely artichokes into the steamer basket over boiling water. Cook for 30-40 minutes, or until a leaf pulls out easily when tugged. Serve immediately, with melted butter, mayonnaise or Lemon Aioli. If you want to serve the artichokes cold, drop them in an ice bath to stop the cooking, then drain on a kitchen towel in the refrigerator until until ready to serve.
Lemon Aioli
About 2/3 cup mayonnaise {homemade or store bought}
1 clove garlic, mashed into a paste with kosher salt or put through a garlic press
Salt & freshly ground pepper to taste {I put more pepper than one would think prudent; it can take quite a bit.}
Fresh lemon juice to taste
Mix all ingredients & chill if not serving immediately.
Relish Plate
Put whatever you want on your relish plate! We have green onions, pickled beets & sauerkraut.
Welcome to Day #4 of Refrigerator Confidential! I’m not sure if you noticed, but we can sure tell that the fridge has more room to move around. Even though it’s great to have a well-stocked refrigerator, it is fun to “eat it down” and look forward to starting all over again on Saturday.
Tuesday’s Meals with Recipes:
Breakfast
Me- leftover baked potato from yesterday’s lunch, 1/2 grapefruit, Breakfast “Borscht”
My husband- same as the last 2 days {plain yogurt, nuts, dried fruit, local honey}
Lunch
Roasted Carrot Soup
Ryvita Crackers with Organic Cultured Butter
I was going to blend up a frozen banana and some plain yogurt to make a banana lassi {although I don’t think you would use frozen fruit in a lassi}, and then it occurred to me that pickled beets and yogurt would be a good combination {think chilled beet borscht with a dollop of sour cream top}. Mine would be kind of a speedy version of chilled beet borscht. A big spoonful of pickled beets, with a creamy cloud of plain yogurt swirled in, and a sprinkle of dill and voila, “borscht”! I tasted it, and thought that some capers would add a nice punch of flavor, and indeed they did. I love capers! Actually, I just learned on the Splendid Table podcast last week that capers are more properly called caper buds, because they are the bud of the caper flower {from the caper plant} before it opens. When the flower drops off, what is left is a caper berry, which looks like a giant caper bud. I have never tried caper berries, but I hear that they are not quite as pungent as the caper buds. Had I not eaten the baked potato, I would have enjoyed my yogurt with a buttered Ryvita {a buttered Ryvita is always good}.
Roasted Carrot Soup adapted from Vegetable Soups from Deborah Madison’s Kitchen
This is another of my favorite soup recipes from Vegetable Soups from Deborah Madison’s Kitchen . I think I have mentioned before that it is my favorite soup cookbook, and Madison is my favorite cookbook author.
1 pound carrots, cut into chunks
2 small potatoes, cut into chunks
1 large onion, cut into chunks
5 garlic cloves, peeled
2-4 tbsp olive oil {I used 4 tbsp extra virgin olive oil}
Sea salt and freshly ground pepper
2 hefty thyme sprigs
1 bay leaf {I used 2}
*1 quart vegetable stock or water
1/2 cup light cream {I used 2% milk, and the soup was delicious. I don’t think I’ve ever made it with cream.}
2-3 tbsp creme fraiche or sour cream, stirred with a fork until loosened {I used plain yogurt, but would use one of the other choices if I had them on hand.}
Fresh minced parsley or chives
Preheat the oven to 425 degrees F {I used 375 degrees F.}. Toss the vegetables with the olive oil and season with 1/2 tsp salt and some pepper. Put them in a large baking dish sprayed with pan spray for easy cleanup {I used a 9″x13″ Pyrex baking dish.}, along with the thyme sprigs and bay leaves. Roast until tender and glazed, about 1 hour, turning them 2-3 times.
Transfer the vegetables to a soup pot, add stock or water and bring to the boil. Simmer until the carrots are soft, about 20″, then puree until smooth. An immersion blender is a great tool for this-very quick and easy. Return the puree to the pot {if you used a blender}, taste for salt, and season with pepper. Stir in the cream or milk.
Ladle the soup into bowls, swirl in a spoonful of creme fraiche, sour cream or yogurt into each, top with minced parsley and serve piping hot. Delicious and super healthy!
Makes about 4 servings {6 cups}.
*I used to make homemade vegetable stock for soup until I read Deborah Madison say that if you have great vegetables, you can use water in lieu of stock. So unless a soup calls for a specific stock {i.e. red stock for tortilla soup, mushroom stock, etc.}, I use water and the soup is great. I do not care for store bought vegetable stock.
This slideshow requires JavaScript.
We had a tasty little wine and cheese pupu {appetizer} while waiting for our Orange and Molokai Purple Sweet Potato Fries to roast.
Orange and Molokai Purple Sweet Potato Fries
This slideshow requires JavaScript.
Roasted Orange and Molokai Purple Sweet Potatoes
Preheat oven to 375 degrees F. Make sure you have a rack positioned on the bottom of your oven.
3 potatoes will fill up a half-sheet pan-use 2 pans if you want more fries
Cut potatoes so they are approximately the same size; you can cut them into any shape you want {slices, wedges, French fries…}. Place potatoes on a sheet pan that has been lined with foil, sprayed with pan spray {they will stick if you don’t} and drizzled with olive oil. Season with kosher or sea salt, freshly ground pepper and red pepper flakes. The red pepper flakes add a great spicy counterpoint to the sweetness of the potatoes; I wouldn’t leave them out, but if you aren’t a fan of spicy, by all means don’t use them. I love spicy!!
Roast the potatoes on the bottom oven rack until they are browned and starting to get crispy, stirring occasionally. They will be tender in about 20 minutes, but leave them in longer so they will brown and crisp up. The purple potatoes can get dried out if you leave them in too long, so keep an eye on them after 20 minutes or so.
This slideshow requires JavaScript.
Steamed Beet Greens
Fresh beet greens {1 pound will serve 2-4 people}
Extra virgin olive oil
Butter
Sea salt & freshly ground pepper
Sherry vinegar or lemon juice
Wash greens well, making sure water is clear, as beet greens can be quite dirty. Discard any tough stems {or cut small & sauté} and roughly chop the greens. Spin them mostly dry, but leave some water clinging to the leaves for steaming. Put greens in a pot large enough to hold them, cover and cook over medium high heat until tender, 10-15 minutes. Stir occasionally so they do not burn or stick. When the greens are tender, season with a little butter, olive oil, sea salt and freshly ground pepper. If desired, sprinkle with a bit of sherry vinegar or lemon juice.
Welcome to Day #3 of Refrigerator Confidential! This week, you are up close and personal with our refrigerator. You can see what we buy at the Saturday Upcountry Farmers Market, and how we prepare it during the week. It’s kind of a game for us {a very tasty game I might add}, and the goal is to eat all or most of the food by Friday, and end up with lots of empty bags to fill up at the market on Saturday. Sometimes we are successful, and sometimes we don’t do so well. The refrigerator’s Friday appearance has to do with how many times we eat out during the week {restaurants, beach BBQs, etc.}, as well as how motivated we are to take the time to wash the greens, broccoli, etc. and cook them. Sometimes it’s easier to throw a salad together, with the already washed lettuce, than to wash and steam the broccoli; I think you know what I mean.
Monday’s Meals:
Breakfast
Me- The little bit of chili and brown rice that was leftover from yesterday
My husband- Nancy’s Low-fat Plain Yogurt with local honey, dried Maui pineapple, dried Maui apple bananas & coconut flakes, roasted peanuts & walnuts
Freshly Pressed Ginger Kombucha {1 bottle is almost gone already!}
Green tea
Lunch
Gerald’s Eggs with Red Peppers & Parmesan {these eggs are a kind of open-face omelette/frittata that Gerald made up~really good}
Baked potato with butter {we shared a potato}
Caesar Salad
Avocado
Dinner
I worked tonight, so we didn’t eat the same thing. We usually do, but it did’t work out this time because there was only 1 piece of Chicken Cacciatore left…for me!
Me- Chicken Cacciatore, broccoli & 1/2 grapefruit {and a piece of chocolate~ Lindt Dark Chocolate with Black Currants!!!}
My husband- sandwich on Dave’s Killer Bread {sometimes we will break down & buy a loaf of bread, if we run out of homemade bread…we like Dave’s} with Gruyere cheese, lots of arugula and mayonnaise {he said it was really good}, broccoli
Welcome to Day #2 of Refrigerator Confidential! This week, I’m taking you inside our refrigerator so you can see what we buy at the Saturday Upcountry Farmers Market, and what we do with it throughout the week. It’s kind of a game for us {a very tasty game I might add}, and the goal is to eat all or most of the food by Friday, and end up with lots of empty bags to fill up at the market on Saturday. Sometimes we are successful, and sometimes we don’t do so well.
Yesterday I told you in words and pictures what we bought at the market. I didn’t say anything about what else was in the refrigerator. We had {not an exhaustive list, by any means}:
leftover homemade chili
leftover brown rice
cooked broccoli
homemade mustard vinaigrette
beets, which I cooked and pickled yesterday
Sunday’s Meals with links to recipes:
Breakfast Me- Nancy’s Low-fat Plain Yogurt with olive oil, salt, pepper, cumin; broccoli with a drizzle of mustard vinaigrette
My husband- Nancy’s Low-fat Plain Yogurt with local honey, dried Maui pineapple, dried Maui apple bananas & coconut flakes, roasted peanuts & walnuts
Freshly Pressed Ginger Kombucha {1 bottle is almost half gone already!}
Green tea
Lunch
Leftover chili & brown rice {they’re almost gone!}
Salad of kale, arugula, pickled beets, Maui onion, Wakame & Ginger Sauerkraut Salad with mustard vinaigrette
Broccoli with olive oil, lemon, salt, pepper, Parmesan and toasted sliced almonds
Dinner Baked salmon with mayonnaise and Sweet Ginger Chili sauce {similar to Thai sweet chili sauce, but with healthier ingredients} Caesar salad with homemade croutons and avocado
Pickled Beets
4 fresh beets, scrubbed and steamed until tender {about 45 minutes for medium size beets}
Onion, sliced {as much as you like, or none}
3/4 cup cider vinegar
1/4 cup sugar
1/4 tsp kosher salt
1/4 tsp whole peppercorns
2 small bay leaves {or 1 large}
When beets are tender when pierced with a knife, let them cool until you can handle them comfortably. Peel off the skins, and cut them into whatever shape you like. Put them into a container with a tight lid, so you can turn them upside down to distribute the pickling liquid. If you are using onions, layer them in with the beets. I usually use a quart mason jar. In a small saucepan, combine all ingredients and bring them to the boil, stirring to ensure that the sugar gets dissolved. Pour over beets and onions. There will not be enough liquid to cover your beets, so turn the container upside down occasionally, and shake to distribute the liquid. They will get tastier as they marinate longer.
“You probably don’t want to look in the crisper drawer.” Amanda Freitag Chef and owner of Empire Diner
Welcome to my refrigerator! I must admit right from the start that I “tidied up” a bit before I let you in. I’m pretty sure that you would probably do the same, if you were planning to invite me in. My husband and I cook many/most of our meals together, but I am the Curator of the Refrigerator. I know what goes in, and its approximate location. The biggest haul that goes into the refrigerator comes from the Saturday farmers market, and I find a home for all of it-no easy feat to be sure. My husband goes to the market very early on Saturday mornings, while I go for a nice long walk, during which time I listen to the Splendid Table podcast on my phone. If you haven’t heard the Splendid Table, I highly recommend that you check it out here. Anyway, back to our refrigerator. This week, I would like to show you what our refrigerator looks like, from its early Saturday morning sparseness to bulging at the seams later Saturday morning, then during the week as we eat our way through all the delicious fruits and vegetables, which come mostly from the Upcountry Farmers Market.
I should say that the way we eat requires time and effort…time and effort that we are willing to put into procuring, preparing and eating delicious food. In no way do I expect that anyone else should necessarily follow our path, because I know that not everyone has the time, desire or knowledge to cook this way. This is what I love to do, and I’m grateful to have the opportunity to spend my time this way.
EARLY SATURDAY MORNING
This slideshow requires JavaScript.
SATURDAY MID-DAY: Fresh Produce from Upcountry Farmers Market
This slideshow requires JavaScript.
From the market today: 3 bunches green onions, 1 head romaine lettuce, 1 bunch kale, 1 dozen eggs, gardenias, red ginger, 5 beets, 2 white potatoes, 12 apple bananas, purple cabbage, 3 bunches arugula, 1 bunch Swiss chard, 4 jalapeños, 3 green peppers, 1 red pepper, cauliflower, 2 broccolis, 1 bunch celery, 2 artichokes, 1 kabocha squash, 2 bottles of Freshly Pressed Ginger Kombucha
SATURDAY MID-DAY: Into the Refrigerator!
SATURDAY AFTERNOON: Everything in its place!
Check out this article from New York Times Magazine about what 11 top New York chefs have in their refrigerators.
Mark Menjivar wrote a book about what’s in others’ refrigerators; it’s kind of fun to take a peek! Check it out here.
I love a good foodie movie. Do you have any favorites? I have a definite favorite, which I will share it in a future post. There are quite a few foodie movies out there, but not nearly enough, in my opinion. Tonight we watched a 2011 documentary called “A Matter of Taste”, by Sally Rowe. Rowe gives viewers an inside glimpse of haute cuisine {literally “high cooking” in French}, by following the career of young chef Paul Liebrandt. She did a great job of documenting his career at a number of restaurants in post 9/11 New York City, in his quest to achieve a Michelin 3 star rating. Liebrandt creates gorgeous dishes, often using techniques from Modernist Cuisine, which is not my cup of tea, but it is interesting to learn about. The movie is available through Netflix streaming and HBO, and I highly recommend checking it out. Here is a link to the trailer.
“Better late than never.” The origin of “better late than never” is Canterbury Tales {circa 1386}, and was coined by Geoffery Chaucer. It comes from the story The Yeoman’s Tale.
The timing of this post leaves a little to be desired, but better late than never they say, and I agree.
I wanted to tell you about a fantastic event that happens on Maui, on the second Monday of each month. It is an opportunity to attend free theatre called ONO {One Night Only}, and it takes place at the Historic Iao Theatre in Wailuku. Not only is it free theatre, it is excellent theatre! Wow, how fortunate we are to have such a great treasure less than 30 minutes from home. Anyway, I was busy finishing up the final project for my physics of cooking class, and everything required to get new tenants into our home across the ocean in Washington. And then. . .I got sick. . .nothing serious, just a cold. . .a dumb pain-in-the-rear cold, which is doing what colds do, traveling to places I’d rather it didn’t, making sleeping difficult. It could be worse, so let’s just forge ahead and be thankful for everything else that is good in life. Needless to say, we did not make it to ONO, and if you went, it was because of your own accord, with no help from me-hope you enjoyed it! Just for the record, it was a one-man show, the actor playing Einstein {he even looks like Einstein in the picture}. There is another great theatre opportunity though, but you need to hurry and get yourself a ticket to see La Cage aux Folles, at the same wonderful Historic Iao Theatre. If you live on Maui, you may know about this terrific local theatre, and may already have a ticket. If you don’t live here, and are lucky enough to be jetting our way before the show closes this weekend {yes I do realize that this notice is terribly last minute}, you should seriously think about going. We were accustomed to attending fantastic theatre in Seattle, and before that San Francisco, and thought that by moving to Maui, we may be trading great theatre for warm, fragrant trade winds, but that is not the case my friends. We have a gem in the Iao Theatre, so hope you will take in a show one day. The next second Monday ONO, presenting Cactus Flower, is on its way soon; see you at the Iao!
If you like frozen desserts {like ice cream!} and haven’t yet tried my Banana Mocha Peanut Butter Soft Serve, I suggest that you do. Or, you could give some frozen bananas and frozen cherries a whirl and try my newest soft serve. I suppose I shouldn’t necessarily call these delectables desserts, because they make fantastic post walk/run/fill-in-the-blank activity treats, and because there is no sugar beyond what is in the fruit and chocolate chips, I deem them to be pretty healthy. Like I mentioned in my Banana Soft Serve post, this is best made and eaten right away, or within the hour {in the freezer of course}. Left in the freezer for too long, the creamy mixture becomes rather hard and difficult to eat unless you process it again. I made a double batch once, and decided it was easier to just make it fresh and enjoy it right away.
We bought a bag of beautiful frozen pitted sweet cherries at Costco, and I’ve just been snacking on them straight from the freezer. Then it occurred to me that cherries and bananas would make a tasty combination, with some dark chocolate thrown in for good measure, and lo and behold, they play together quite nicely indeed.
Banana Cherry Soft Serve with Chocolate
1 medium to large frozen banana
6 frozen sweet cherries
10 dark chocolate chips {I love Ghirardelli 60% Bittersweet chips}
1/4 tsp vanilla extract
Walnuts Raw cacao nibs
Slice the frozen banana into the work bowl of a food processor {For this quantity I use a mini food processor. You could use a blender, but you will need some liquid to get it going.}
Add cherries, chocolate chips and vanilla. Process until smooth and creamy.
Top with raw cacao nibs and walnuts. Enjoy!
Variations:
~ You can use all chocolate chips {or chop your favorite chocolate} or all cacao nibs
~ Substitute sour cherries for sweet, but you may need to add something sweet.
It feels good to be back in the author’s chair {actually, I usually write from the sofa} and writing again! When I first started writing Maui Girl Cooks, I had no idea how much I would enjoy writing about food, and sharing my thoughts and recipes with all of you. I have always enjoyed the editing process, and writing about my food passion is just such a pleasure; perhaps I should have started a blog several years ago, but I’m quite sure I didn’t have time to teach full time and write a blog.
I’m sad that I’ve been “off the air” for so long. I didn’t fall off the face of the earth; I wasn’t trekking around the globe; I wasn’t sick; I wasn’t struck by lightning; I didn’t stop loving everything to do with food. No, my absence had everything to do with our computer. The computer that we have been cursing for so long finally died. It was acting up for quite a long time, then it finally gave up the ghost; I came home one day and it was stone cold dead. No amount of wishing, coaxing or pressing function keys would bring it back to life. This became the golden opportunity to ditch the Windows machine and finally become a 100% Apple household. Score! But there is a learning curve when you switch operating systems, so please bear with me. Writing posts on my iPhone seemed like a chore, so I didn’t. The online physics of cooking class that I’m taking is still in session. I did 2 weeks worth of lectures, homework and labs on my iPhone; oh my, that was interesting, but I made it through. I’m pleased and proud that I have completed all homework and labs to a degree sufficient for a Harvard certificate of completion, once I complete my final project, which has to do with making perfect chocolate chip cookies. I will let you know all of the details, once I have finished tweaking everything to my satisfaction.
Since we moved to Maui, the best salmon we have eaten has been from a can {very tasty canned salmon}. Fresh salmon of the caliber that we were accustomed to in the Pacific Northwest isn’t found in the grocery stores here; it just isn’t as fresh. It’s a small price to pay for being warm in March. Anyway, back in September, we had the opportunity to purchase wild Alaskan sockeye salmon. My husband happened to be talking with a nutritionist at the gym, and she mentioned that a friend would be bringing in Alaskan salmon, and asked if we would be interested in buying some. But of course we would! The filets were cleaned, vacuumed sealed, frozen and absolutely gorgeous! The salmon came packed in 20 pound boxes, and we decided to buy 2 boxes. We sold a few filets, but have been enjoying this delicious salmon several times each week.
We have prepared it a number of ways, but here is our favorite way to cook this succulent and healthy fish.
Baked Salmon
1 salmon filet, rinsed and patted dry, pick out any bones you can see/feel
Mayonnaise {homemade or store bought}
Salt and pepper {kosher or sea salt, freshly ground pepper}
Thai sweet chili sauce
Green onions, thinly sliced
Fresh cilantro, whole leaves or minced
Line a baking sheet with foil and spray with pan spray. Place the salmon skin side down on a baking sheet. Sprinkle salmon with salt and pepper. Spread a thin layer of mayonnaise over the fish {I use a table knife to do this}. Drizzle salmon with Thai sweet chili sauce. Bake in a preheated 400 degree oven, until the salmon registers 140 degrees F, about 15 minutes. You can cut into the salmon to check for doneness, but I prefer using a thermometer. If you cut into it, make sure it is still moist in the center, as it will continue to cook once it is out of the oven. Leaving it in the oven until it looks completely cooked {i.e. flaky} will result in salmon that is dry and overdone. Sprinkle the top with thinly sliced green onions and/or fresh cilantro when ready to serve.
The mayonnaise keeps the salmon moist, and the Thai sweet chili sauce adds a nice flavor. The chili sauce has no redeeming qualities other than tasting good, and it is one of the few prepared foods we use. It’s not something we eat everyday, and when we do, we don’t eat a lot of it, so we don’t feel too bad. Call it a guilty pleasure. We always eat some of the salmon right away, but think that it is even better the next day; it seems more moist for some reason. As a matter of fact, the next day we like to prepare one of our favorite new creations. It is an adaptation of the Asian Salmon Bowl that we used to order at The Harbourhouse Pub in Winslow, WA. We have expanded upon their bowl of brown rice, fresh spinach, Asian slaw, ginger vinaigrette and wild salmon, and made something even more delectable.
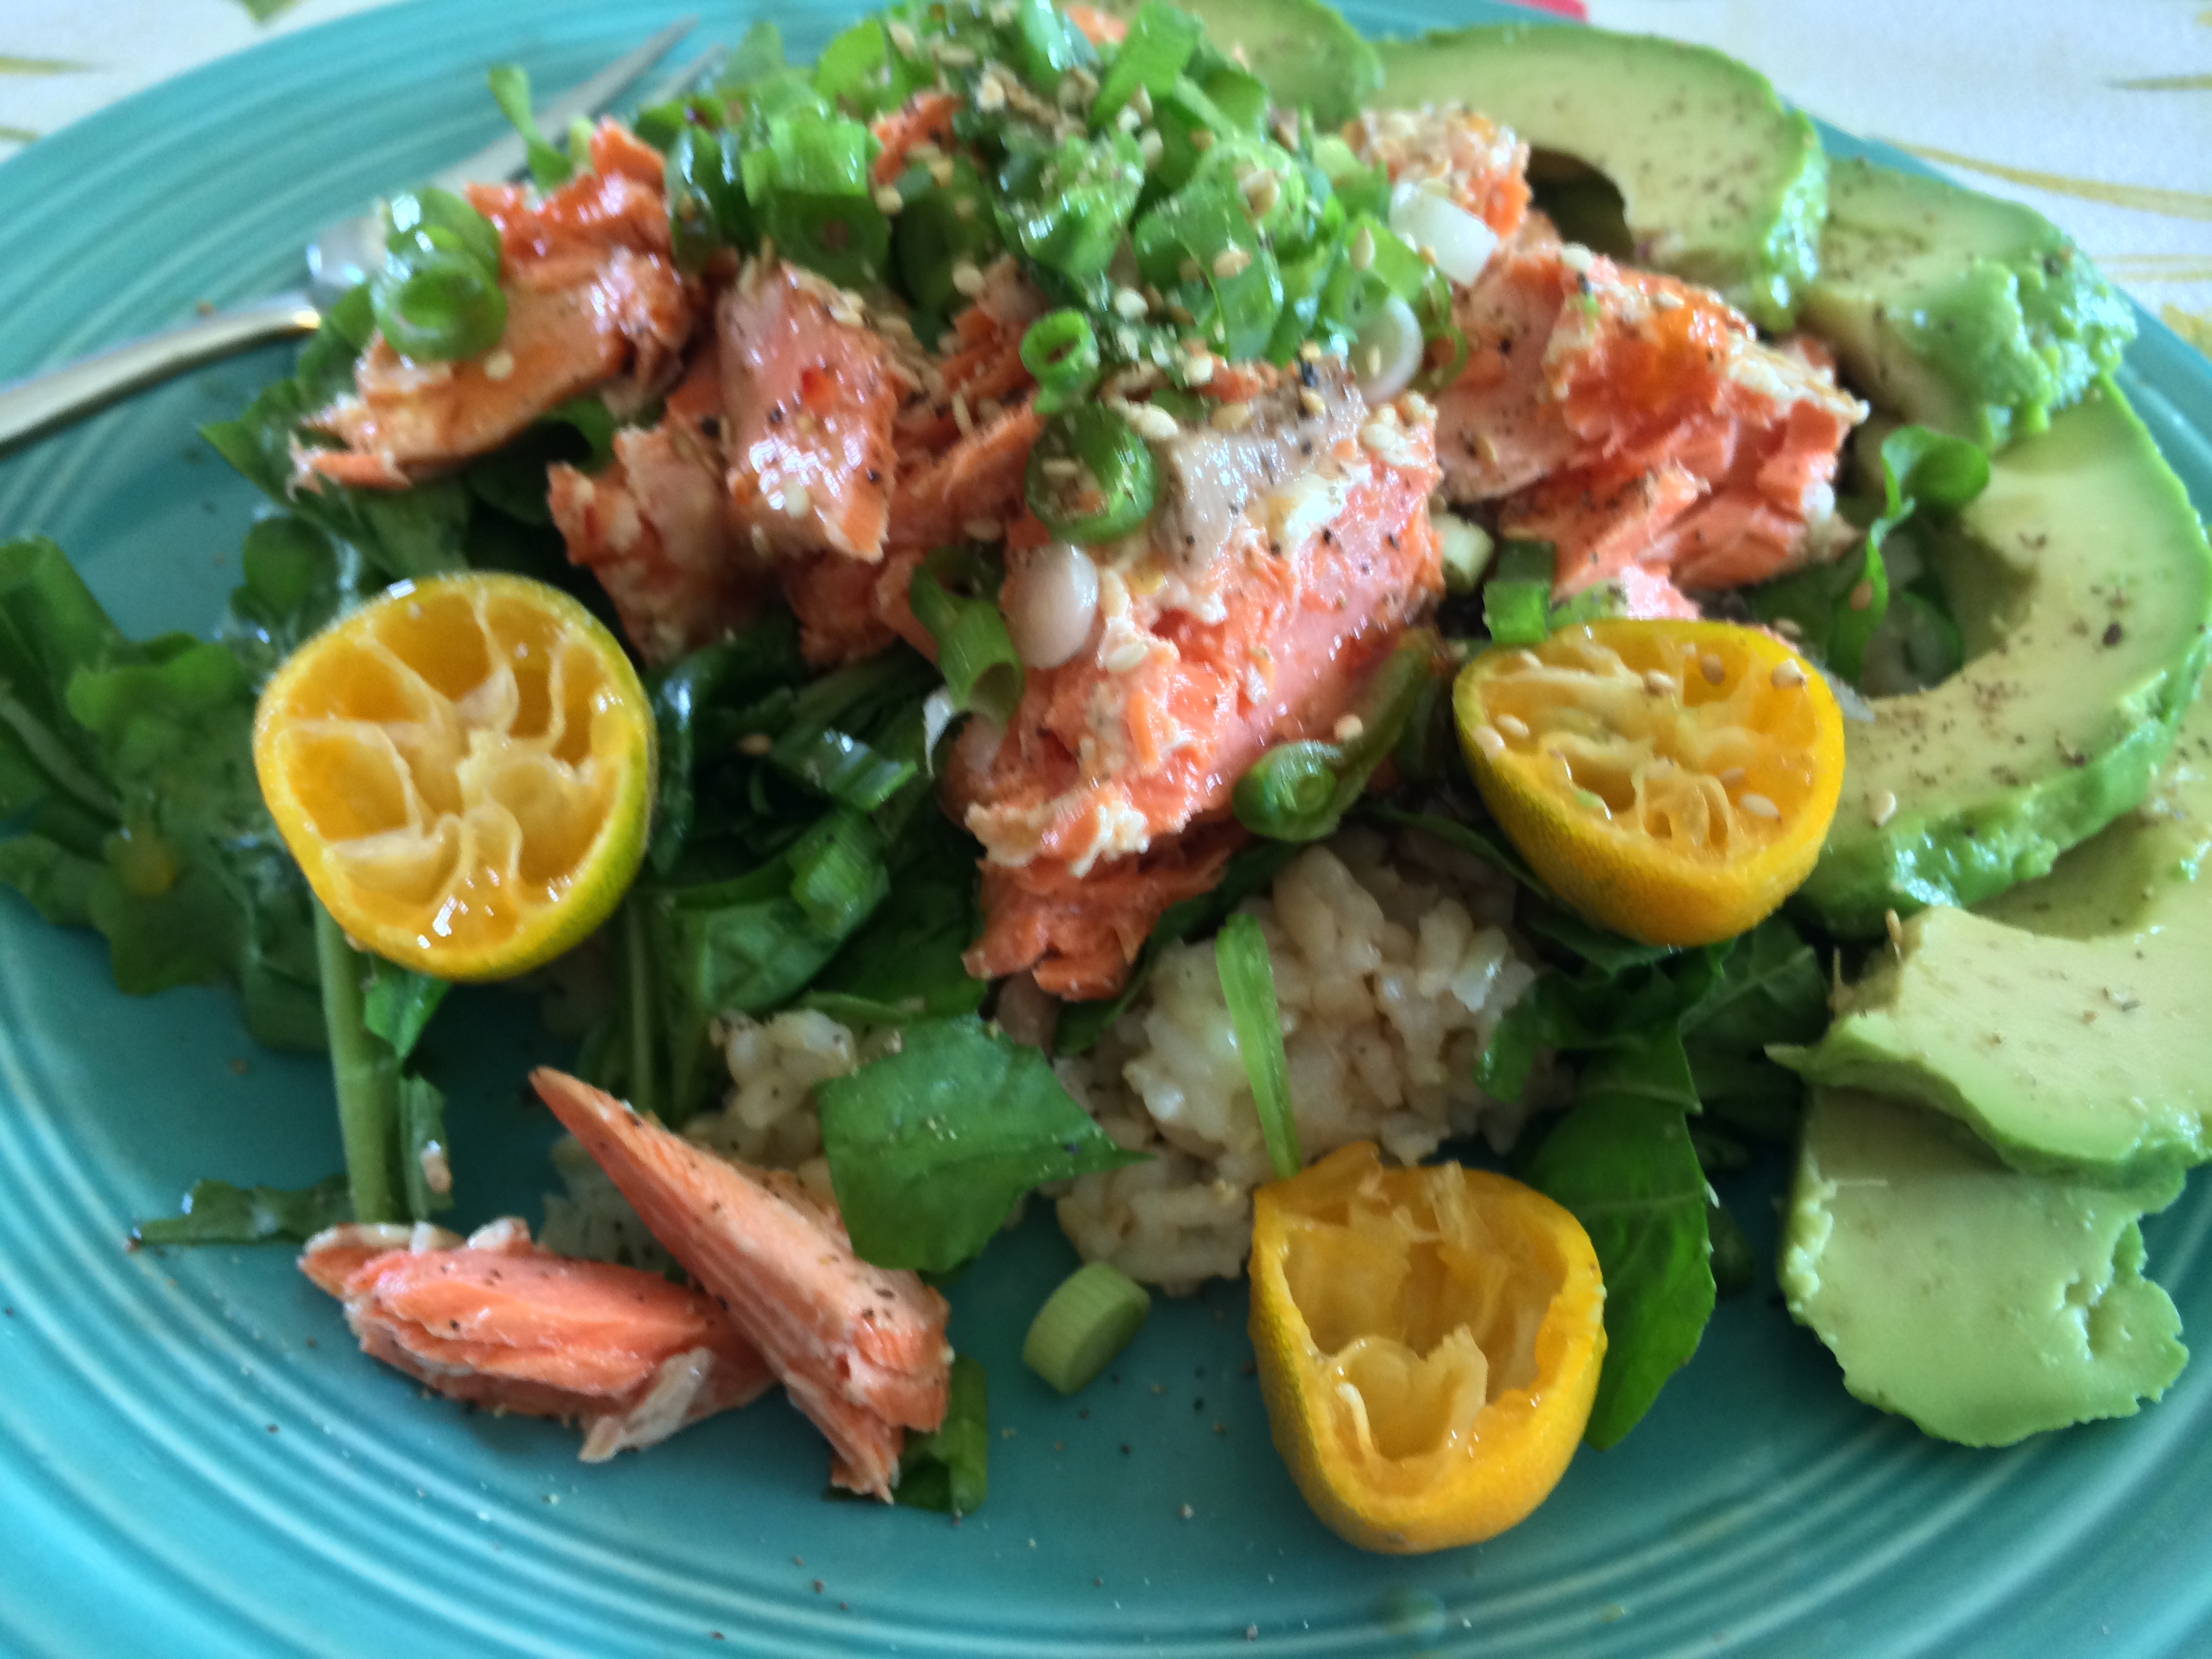
Salmon Salad with Brown Rice and Asian Flavors
Cooked brown rice {of course, you can use any rice you like}
Cooked salmon
Arugula, julienned
Snow peas, cut into thin slivers {optional, but adds great crunch}
Fresh jalapeños, thinly sliced {if you like a little zest}
Green onions, thinly sliced {reserve some of the greens for the top}
Extra virgin olive oil
Citrus of some kind {I used Calamansi limes this time}
Unseasoned rice vinegar {use seasoned if you prefer}
Tamari or low sodium shoyu {soy sauce}
Salt and pepper
Toasted sesame seeds
Sliced avocado
Variations. . .
Crunch- If you don’t have any snow peas, you can use something else to add crunch like matchstick size carrots, sliced almonds, thinly sliced cabbage, roasted peanuts or celery.
Protein- No salmon in sight? Try some barbecued chicken, tempeh, tofu or steak.
Citrus- Calamansi lime, regular lime, lemon, orange or tangerine
Greens- arugula, romaine or some other sturdy lettuce
If your rice isn’t freshly cooked, warm it up and sprinkle with shoyu and rice vinegar. Top the rice with greens of your choice, julienned into bite size pieces. Toss the jalapeños, snow peas and green onions {or your favorite crunchy ingredients} on top of the greens. Season with salt and pepper. Top with salmon, or other protein. Drizzle with Thai sweet chili sauce, then squeeze a good amount of citrus over all. Shower with thinly sliced green onion tops and toasted sesame seeds. Add some lovely green slices of ripe avocado and enjoy!
This is going to be an express post, because I have a lot of things I want to get done today, but I want to tell you about our new favorite way to eat asparagus . . . just in case you get your hands on some fresh asparagus. To our great delight, a new crop of Maui-grown asparagus has hit the Upcountry Farmers Market! If asparagus isn’t available in your area just yet, don’t fret-spring is coming your way soon. Just for the record, I love thick spears of asparagus; I want to know that I am biting into something. We enjoy asparagus steamed, then topped with freshly squeezed lemon/lime juice, freshly ground salt and pepper and homemade mayonnaise. It’s also fantastic roasted in a hot oven, after rolling around in some extra virgin olive oil, freshly ground salt and pepper and sprigs of fresh thyme. I was looking for ideas in my newest Deborah Madison book, Vegetable Literacy, and found a way to cook asparagus that we think is genius, not to mention downright delicious. It is pretty much the same technique as this green been recipe I shared with you a few months ago, which is our new favorite way to eat green beans.
Griddled Asparagus
adapted from Vegetable Literacy {Madison}
1 bunch asparagus
olive oil, for coating asparagus
kosher salt
Maldon Sea Salt, or other flaky sea salt, to finish
freshly ground pepper
If you are using asparagus with thick spears, peel the lower parts so they will be tender. Toss the spears with olive oil to coat {you don’t need a lot} and season lightly with salt. Heat a cast iron skillet over medium high heat.
When the pan is hot, add your asparagus. Don’t move it around just yet; you want some color to form on the spears that are in contact with the pan. When you see some beautiful browned spots on your asparagus, toss the spears around in the pan. You do not need to methodically move them one by one. Keep the heat on medium high and continue cooking the asparagus for several more minutes, until they are tender when poked with a sharp knife. Some of the larger spears may still be a little al dente {crisp}, but I assure you they will be perfectly delicious.
Serve the griddled asparagus on a platter sprinkled with whatever crunchy salt you have selected. Although I think it is perfect just like this, without any other additions, Madison suggests rolling the cooked spears around in Tarragon Butter and a few other sauces from her book. I greatly respect Madison’s opinions when it comes to making delicious food, so I will probably try some of these sauces in the future.
“One of the very nicest things about life is the way we must regularly stop whatever it is we are doing and devote our attention to eating.” Luciano Pavarotti
“One of the very nicest things about life is the way we must regularly stop whatever it is we are doing and devote our attention to eating.” Luciano Pavarotti
“One of the very nicest things about life is the way we must regularly stop whatever it is we are doing and devote our attention to eating.” Luciano Pavarotti
“One of the very nicest things about life is the way we must regularly stop whatever it is we are doing and devote our attention to eating.” Luciano Pavarotti
“One of the very nicest things about life is the way we must regularly stop whatever it is we are doing and devote our attention to eating.” Luciano Pavarotti
“One of the very nicest things about life is the way we must regularly stop whatever it is we are doing and devote our attention to eating.” Luciano Pavarotti
“One of the very nicest things about life is the way we must regularly stop whatever it is we are doing and devote our attention to eating.” Luciano Pavarotti
“One of the very nicest things about life is the way we must regularly stop whatever it is we are doing and devote our attention to eating.” Luciano Pavarotti
“One of the very nicest things about life is the way we must regularly stop whatever it is we are doing and devote our attention to eating.” Luciano Pavarotti
“One of the very nicest things about life is the way we must regularly stop whatever it is we are doing and devote our attention to eating.” Luciano Pavarotti