Maui Girl Cooks

“One of the very nicest things about life is the way we must regularly stop whatever it is we are doing and devote our attention to eating.” Luciano Pavarotti


7 Comments

Wild Alaskan Salmon

It feels good to be back in the author’s chair {actually, I usually write from the sofa} and writing again!  When I first started writing Maui Girl Cooks, I had no idea how much I would enjoy writing about food, and sharing my thoughts and recipes with all of you.  I have always enjoyed the editing process, and writing about my food passion is just such a pleasure; perhaps I should have started a blog several years ago, but I’m quite sure I didn’t have time to teach full time and write a blog.   

I’m sad that I’ve been “off the air” for so long.  I didn’t fall off the face of the earth; I wasn’t trekking around the globe; I wasn’t sick; I wasn’t struck by lightning; I didn’t stop loving everything to do with food.  No, my absence had everything to do with our computer.  The computer that we have been cursing for so long finally died.  It was acting up for quite a long time, then it finally gave up the ghost; I came home one day and it was stone cold dead.  No amount of wishing, coaxing or pressing function keys would bring it back to life.  This became the golden opportunity to ditch the Windows machine and finally become a 100% Apple household.  Score!  But there is a learning curve when you switch operating systems, so please bear with me. Writing posts on my iPhone seemed like a chore, so I didn’t.  The online physics of cooking class that I’m taking is still in session.  I did 2 weeks worth of lectures, homework and labs on my iPhone; oh my, that was interesting, but I made it through.  I’m pleased and proud that I have completed all homework and labs to a degree sufficient for a Harvard certificate of completion, once I complete my final project, which has to do with making perfect chocolate chip cookies.  I will let you know all of the details, once I have finished tweaking everything to my satisfaction.   

Since we moved to Maui, the best salmon we have eaten has been from a can {very tasty canned salmon}.  Fresh salmon of the caliber that we were accustomed to in the Pacific Northwest isn’t found in the grocery stores here; it just isn’t as fresh.  It’s a small price to pay for being warm in March.  Anyway, back in September, we had the opportunity to purchase wild Alaskan sockeye salmon. My husband happened to be talking with a nutritionist at the gym, and she mentioned that a friend would be bringing in Alaskan salmon, and asked if we would be interested in buying some.  But of course we would!  The filets were cleaned, vacuumed sealed, frozen and absolutely gorgeous!  The salmon came packed in 20 pound boxes, and we decided to buy 2 boxes.  We sold a few filets, but have been enjoying this delicious salmon several times each week.

We have prepared it a number of ways, but here is our favorite way to cook this succulent and healthy fish.

IMG_1611

 Baked Salmon

1 salmon filet, rinsed and patted dry, pick out any bones you can see/feel

Mayonnaise {homemade or store bought}

Salt and pepper {kosher or sea salt, freshly ground pepper}

Thai sweet chili sauce

Green onions, thinly sliced

Fresh cilantro, whole leaves or minced

Line a baking sheet with foil and spray with pan spray.  Place the salmon skin side down on a baking sheet.  Sprinkle salmon with salt and pepper.  Spread a thin layer of mayonnaise over the fish {I use a table knife to do this}.  Drizzle salmon with Thai sweet chili sauce.  Bake in a preheated 400 degree oven, until the salmon registers 140 degrees F, about 15 minutes.  You can cut into the salmon to check for doneness, but I prefer using a thermometer.  If you cut into it, make sure it is still moist in the center, as it will continue to cook once it is out of the oven.  Leaving it in the oven until it looks completely cooked {i.e. flaky} will result in salmon that is dry and overdone. Sprinkle the top with thinly sliced green onions and/or fresh cilantro when ready to serve.

The mayonnaise keeps the salmon moist, and the Thai sweet chili sauce adds a nice flavor.  The chili sauce has no redeeming qualities other than tasting good, and it is one of the few prepared foods we use.  It’s not something we eat everyday, and when we do, we don’t eat a lot of it, so we don’t feel too bad.  Call it a guilty pleasure.  We always eat some of the salmon right away, but think that it is even better the next day; it seems more moist for some reason.  As a matter of fact, the next day we like to prepare one of our favorite new creations.  It is an adaptation of the Asian Salmon Bowl that we used to order at The Harbourhouse Pub in Winslow, WA.  We have expanded upon their bowl of brown rice, fresh spinach, Asian slaw, ginger vinaigrette and wild salmon, and made something even more delectable.

Salmon with Brown Rice and Asian Flavors

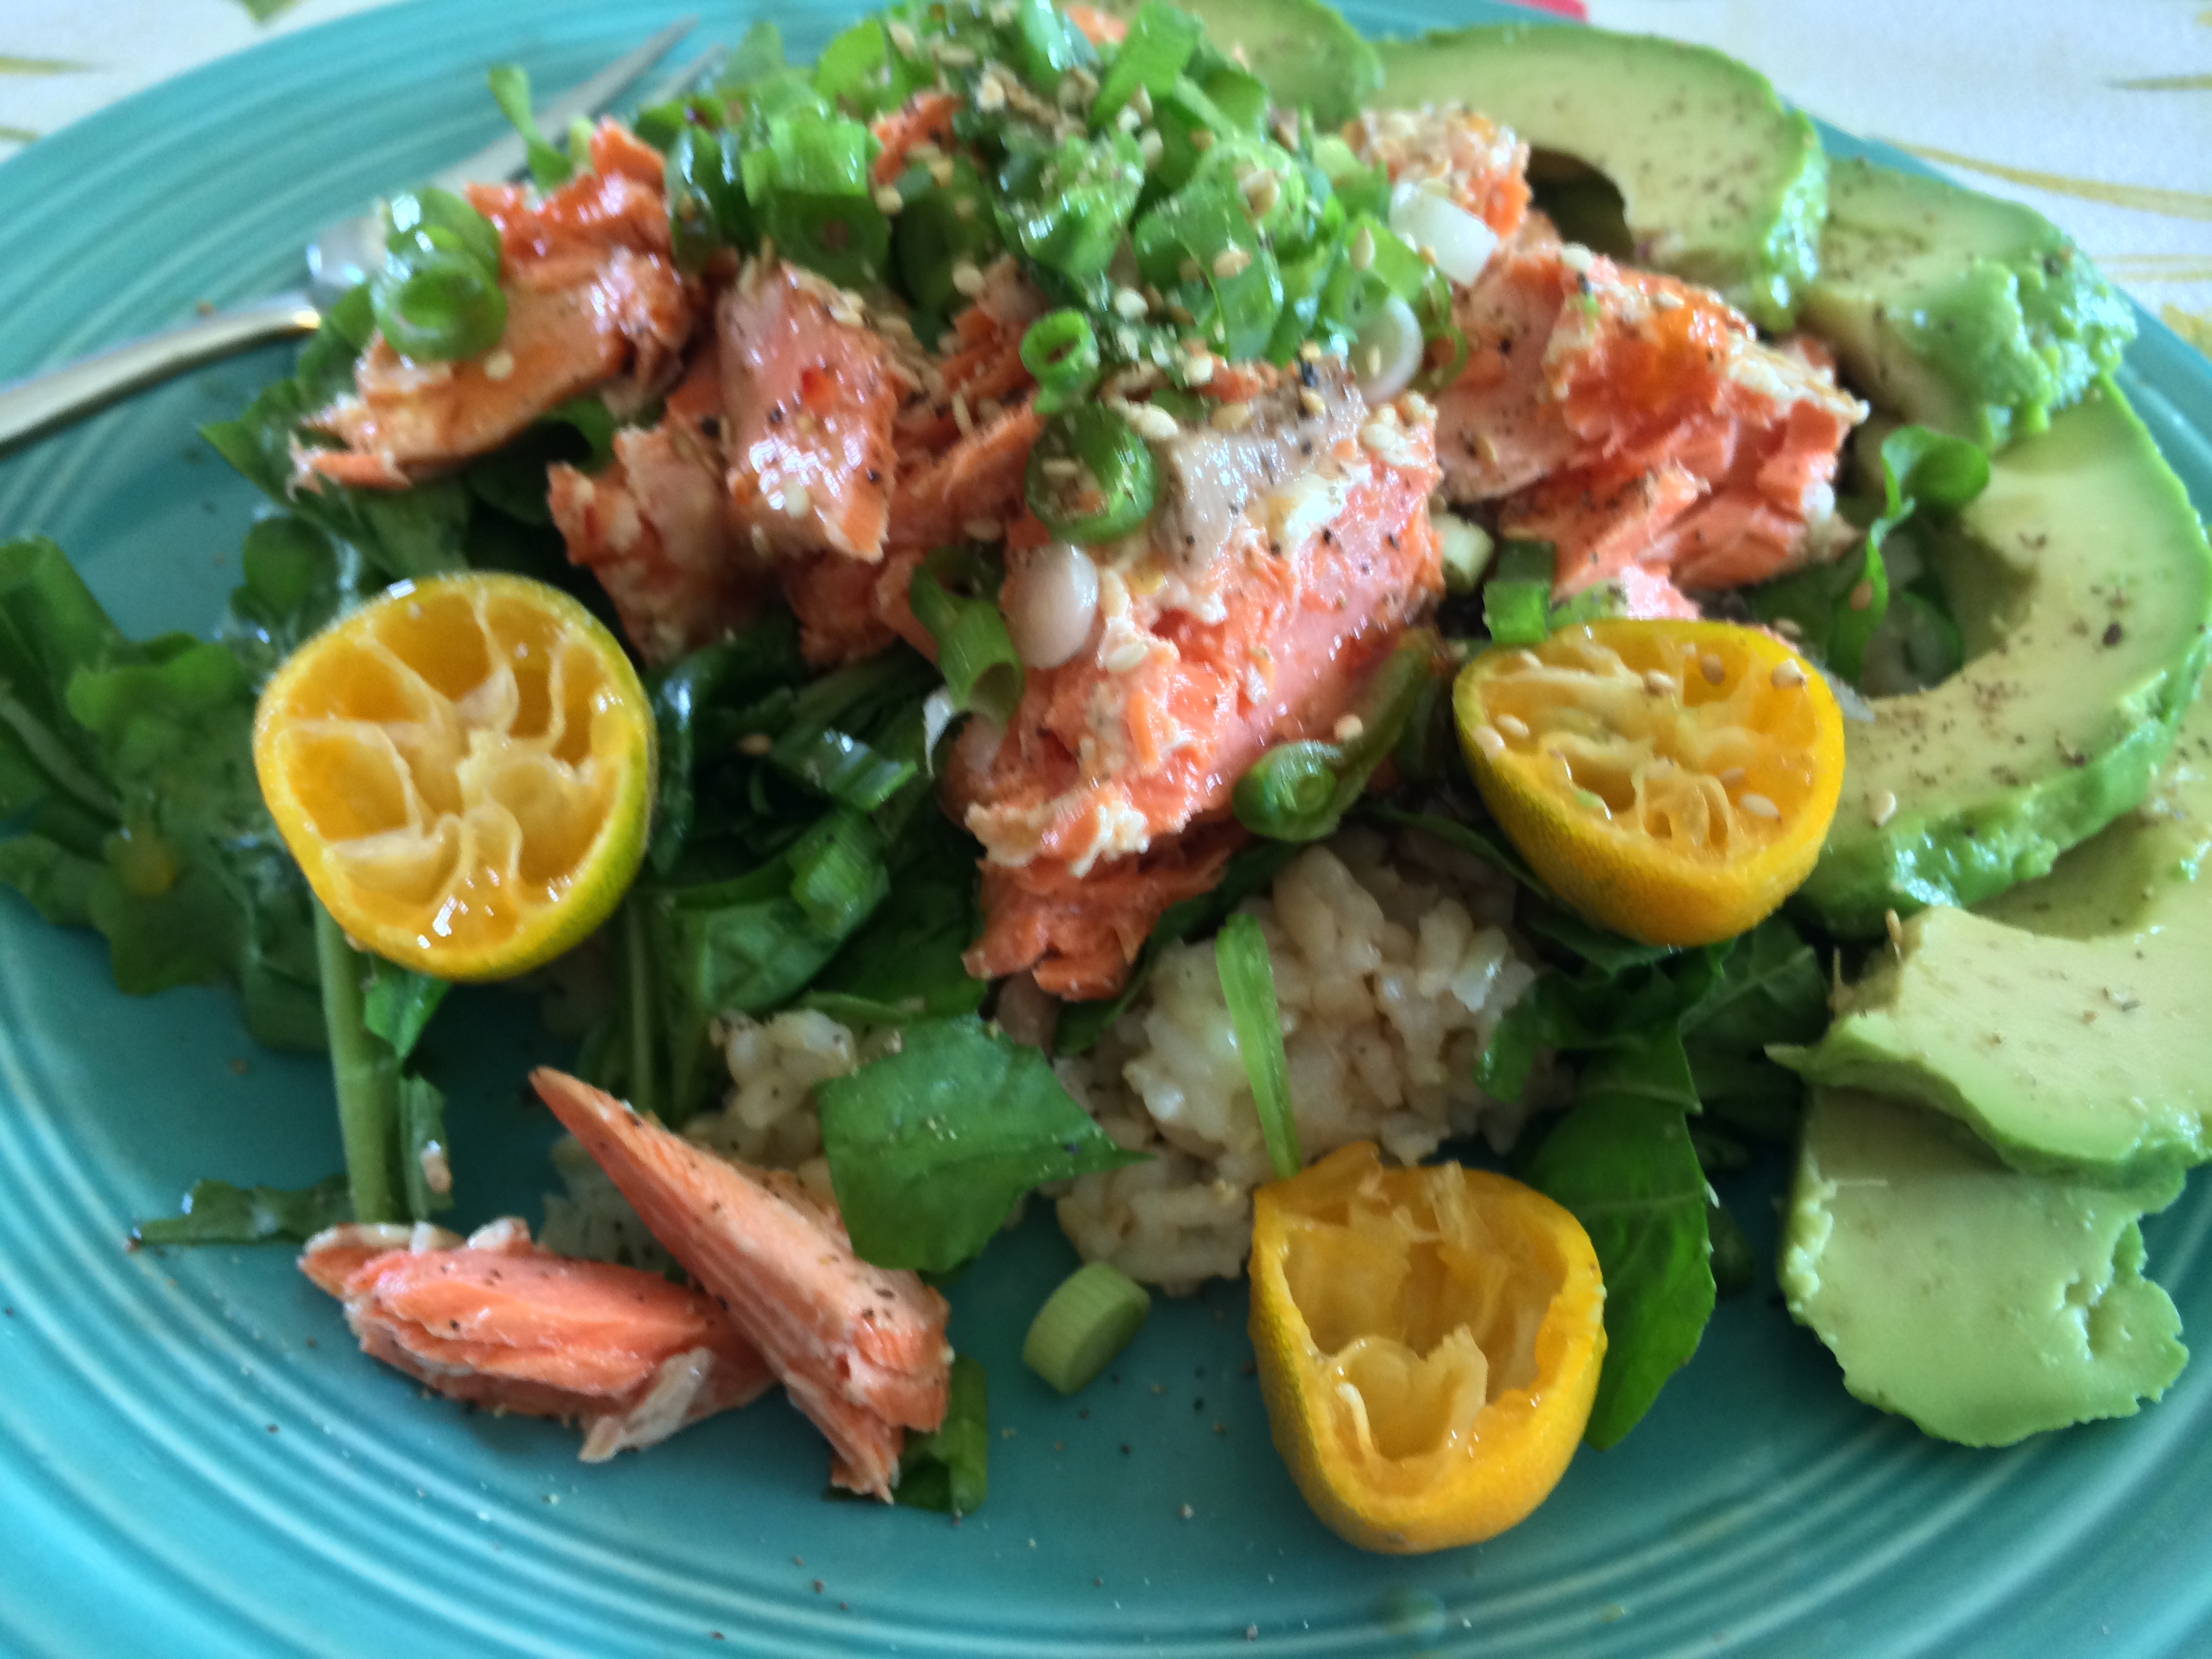
Salmon Salad with Brown Rice and Asian Flavors

Cooked brown rice {of course, you can use any rice you like}

Cooked salmon

Arugula, julienned

Snow peas, cut into thin slivers {optional, but adds great crunch}

Fresh jalapeños, thinly sliced {if you like a little zest}

Green onions, thinly sliced {reserve some of the greens for the top}

Extra virgin olive oil

Citrus of some kind {I used Calamansi limes this time}

Unseasoned rice vinegar {use seasoned if you prefer}

Tamari or low sodium shoyu {soy sauce}

Salt and pepper

Toasted sesame seeds

Sliced avocado

Variations. . .

Crunch-  If you don’t have any snow peas, you can use something else to add crunch like matchstick size carrots, sliced almonds, thinly sliced cabbage, roasted peanuts or celery.

Protein- No salmon in sight?  Try some barbecued chicken, tempeh, tofu or steak.

Citrus- Calamansi lime, regular lime, lemon, orange or tangerine

Greens- arugula, romaine or some other sturdy lettuce

If your rice isn’t freshly cooked, warm it up and sprinkle with shoyu and rice vinegar.  Top the rice with greens of your choice, julienned into bite size pieces.  Toss the jalapeños, snow peas and green onions {or your favorite crunchy ingredients} on top of the greens.  Season with salt and pepper.  Top with salmon, or other protein.  Drizzle with Thai sweet chili sauce, then squeeze a good amount of citrus over all.  Shower with thinly sliced green onion tops and toasted sesame seeds.  Add some lovely green slices of ripe avocado and enjoy!

Bon appétit!

Cultured Foods {aka Bugs, Who Needs ‘Em?}

1 Comment

“Fermented foods help people stay healthy,” Sandor Katz author of New York Times best-selling book “The Art of Fermentation.”

Before we get to the heart of the matter of cultured foods, here is a photo of yesterday’s sky.  I was at the pool and the sky was so beautiful I had to take a picture.  The picture doesn’t do it justice, but you get the idea.

October sky

My husband and I do a good job of learning about what constitutes a healthy lifestyle in terms of eating and exercise, and then we implement what we have learned to the best of our abilities. Our latest foray into healthy eating is fermented {cultured} foods. Please understand that in no way do I consider myself an expert on cultured foods; I am far from an expert, and know just enough to be dangerous. We have been eating cultured foods for years, because we enjoy them, but have intentionally added more into our diet because of the health benefits. Here are some of our favorite cultured foods, all of which we buy at Mana Foods, for those of you on Maui:
~ YogurtNancy’s Yogurt {contains 11 different culture strains} has been a staple for more than a decade.
~ Sauerkraut and Fermented Pickles- We have recently started purchasing sauerkraut that is raw and unpasteurized, so that the beneficial microbes are available to us. One of our favorite brands is Sonoma Brinery. Farmhouse Culture makes fantastic sauerkraut as well. I LOVE their Smoked Jalapeno Kraut; I don’t find it at all smoky, but perfectly spicy! My husband prefers the Ginger Beet flavor, which I also like, but not as much as the Smoked Jalapeno. Both of these companies offer excellent products that are reasonably priced.  If you want sauerkraut, these are a must try!
~ Kombucha We drink a little kombucha most days. Our kombucha comes from Maui Kombucha.
~ GoodBelly Probiotic Drink This is a delicious nondairy nectar-like drink. My favorite flavor is Mango.  If you sign up for their Goodbelly Challenge, they will email you some coupons!
~ Sour Cream- We often spoon a bit of cultured sour cream on our quesadillas. Sour cream is always a yummy addition to a spicy dish.
~ Tempeh Tempeh is a fermented soy product from Indonesia. Our current favorite way to eat tempeh is seasoned with freshly ground salt and pepper and sautéed in a bit of coconut oil until golden brown.   Eat with ketchup and you have something that resembles French fries. A heavy drizzle of Sriracha Sauce is a great addition, if you like a little mouth burn, like I do.  We also make a delicious sandwich that we call a “TLT” meaning Tomato, Lettuce and Tempeh.  It is fantastic on toasted ciabatta bread.  Our tempeh is in the freezer until we are ready to eat it, and then it thaws very quickly.
~ Miso- I like kale salad with Outstanding Miso Sesame Dressing. There is also miso soup, which is delicious!

Here are a few of the cultured foods we’ve enjoyed in the last few days:

This slideshow requires JavaScript.

Tempeh Sautéed in Organic Coconut Oil

Slice tempeh into approximately 1/2 inch slices.  Spray skillet {we use cast iron} with pan spray, then melt about 1 tbsp. of coconut oil.  When the oil is hot, add the tempeh slices.  Season with freshly ground salt and pepper to taste. Sauté, turning occasionally, until golden brown.  Serve hot with ketchup and Sriracha Sauce, or whatever you like.

This slideshow requires JavaScript.

Yogurt with Pineapple, Peach and Cranberry Preserves

Put some yogurt in a bowl, and top with homemade preserves, and your choice of any or all of the following toppings:  unsweetened coconut, maple syrup {the real stuff please, preferably Grade B}, good quality honey, cinnamon, cacao nibs, nuts, hemp seeds, ground flax seeds, Buckwheat Chia Crunch  or anything else you’d like.

Pineapple, Peach and Cranberry Preserves

**This is really more of a guideline than a specific recipe.  You can adjust everything to your taste, including changing the fruits to what you have available.

1 Maui Gold pineapple
1 quart chunked fresh or frozen peaches
2 cups fresh or frozen cranberries
1 cinnamon stick
approximately 1 tbsp. good quality honey
Juice of 1/2 a juicy lemon
Grind of salt

Get a Maui Gold pineapple if you can {we buy ours at Costco, maybe Mainland Costco sells them also-I think they do}, otherwise a “regular” fresh pineapple will do.  Cut up the pineapple into chunks {see previous pineapple blog post}.  Put all of the pineapple chunks into a wide-mouthed saucepan {for better evaporation of the liquid}.  Add 1 quart of peach chunks {we used the peaches we froze in August} and 2 cups fresh or frozen cranberries.  You can certainly use a different berry if you are not a cranberry fan, but you can’t really identify them as cranberries as far as taste goes .  Squeeze half a lemon and add the juice, and then throw in a cinnamon stick and a grind of salt.  Spoon in some good quality honey to taste.  We used about 1 tbsp.  Bring to a boil, and then turn down the heat and simmer on low until thickened.  The timing will depend on how juicy your fruit is.  The  preserves will thicken as they cool.

These preserves are meant to be made and eaten within a week or so; they are not preserved, so will not keep.

These preserves also taste great with one of our new favorite breads, from 101 Cookbooks.  I have made several of her bread recipes, and we have loved them all.

easy_little_bread_recipe 1000Photo from 101 Cookbooks

Easy Little Bread
from 101 Cookbooks
1 1/4 cups / 300 ml warm water (105-115F)
2 teaspoons active dry yeast (one packet)
1 tablespoon runny honey
1 cup / 4.5 oz / 125 g unbleached all-purpose flour
1 cup / 5 oz / 140 g whole wheat flour
1 cup / 3.5 oz / 100 g rolled oats (not instant oats)
1 1/2 teaspoons fine grain sea salt
2 tablespoons butter, melted, for brushing

In a medium bowl, sprinkle the yeast onto the warm water and stir until the yeast dissolves. Stir in the honey and set aside for a few minutes, until the yeast blooms and swells a bit – 5 – 10 minutes.

In the meantime, mix the flours, oats, and salt in a large bowl. Add the wet mixture to the dry and stir very well.

Brush an 8-cup loaf pan {9″x5″} generously with some of the melted butter. Turn the dough into the tin, cover with a clean, slightly damp cloth, and set in a warm place for 30 minutes, to rise.

Preheat the oven to 350F / 180C, with a rack in the middle. When ready, bake the bread for 35-40 minutes, until golden and pulling away from the sides of the pan. I finish things up by leaving the bread under the broiler for just a heartbeat – to give the top a bit deeper color. Remove from oven, and turn the bread out of the pan quickly. Let it cool on a rack so it doesn’t steam in the pan. Serve warm, slathered with butter.

Makes 1 loaf.

Adapted from Gran’s Kitchen: Recipes from the Notebooks of Dulcie May Booker.

Prep time: 10 min –    Cook time: 35 min

My Variations of Easy Little Bread {follow the same mixing instructions as the original recipe}

Variation #1:  Oat Rye Bread with Sunflower Seeds

1 1/4 cups / 300 ml warm water (105-115F)
2 teaspoons active dry yeast (one packet)
1 tablespoon runny honey
140 grams whole wheat flour
100 grams oats {not instant}
65 grams dark rye flour
60 grams unbleached white flour
1/2 cup sunflower seeds
1 1/2 teaspoons fine grain sea salt {I used kosher salt}
2 tablespoons butter, melted, for brushing

Variation #2:  Cinnamon Date Bread with Walnuts

1 1/4 cups / 300 ml warm water (105-115F)
2 teaspoons active dry yeast (one packet)
1 tablespoon runny honey
140 grams whole wheat flour
100 grams oats
125 grams unbleached white flour
3 tsp cinnamon
1 1/2 teaspoons fine grain sea salt {I used kosher salt}
2 tablespoons butter, melted, for brushing
5 dates, snipped into small pieces

Have you added any delicious cultured foods to your meals?  If so, which ones?

If you are in Maui, you may want to visit the Upcountry Farmer’s Market.  They sell many different kinds of cultured foods there.

Additional Reading:
http://michaelpollan.com/articles-archive/some-of-my-best-friends-are-germs/

Cultures for Health

The Art of Fermentation by Sandor Katz

Video of Sandor Katz talking about fermented foods

Cooked: A Natural History of Transformation by Michael Pollan

Bon appetit!


4 Comments

“These are decadent!”  a comment from one of my coworkers

It’s been a long day, so this will be a quick post.  I took these cookies to work today, & they were a hit.  These cookies are great if  you…

… are craving cookies.

… are craving chocolate or mocha.

… need a quick dessert to take to a potluck.

… want to surprise your friend with cookies.

… you had a light dinner and feel like a little dessert.

… you get the idea!

Close up of cookies

Mocha Truffle Cookies

1/2 cup unsalted butter
1/2 cup chocolate chips {I use Ghirardelli 60% Bittersweet}
3 tsp instant coffee {I use 2 packets Starbucks Via}
2/3 cup granulated white sugar
2/3 cup packed light brown sugar
2 eggs, lightly beaten
2 tsp vanilla extract
2 cups whole wheat pastry flour
4 tbsp plus 4 tsp unsweetened cocoa powder
1/2 tsp baking powder
1/4 tsp kosher salt
2/3 cup Heath Bits ‘o Brickle Toffee Bits
Maldon salt {optional, but a delicious addition}

In a large microwave safe bowl, melt butter & chocolate chips; stir until smooth, and then stir in coffee and stir until dissolved; let cool for 5 minutes.  Add sugars, eggs and vanilla.  Combine the flour, cocoa, baking powder and salt; add to chocolate mixture and mix well.  Stir in toffee bits. 

Drop by rounded tablespoonfuls about 2 inches apart {I prefer to weigh my cookie balls, making them 1 1/4 ounces each.} onto a baking sheet sprayed with nonstick spray, or lined with parchment or Silpat.  Sprinkle a pinch {2-3 flakes per cookie} of Maldon salt flakes on top of cookies.

Bake cookies at 350 degrees for 8-10 minutes, or until edges are set.  Cool for 1 minute on the cookie sheet, and then remove to a wire rack to cool completely.  Makes about 24.

Notes:
~ To melt butter and chocolate chips, I microwave on 50% power for 1 minute, stir and then do another minute at 50% power.  Microwaves vary, so your timing may be different.
~ Add chopped nuts if you like.
~ You can adjust the coffee up or down to your taste.
~ Don’t overbake!  I take the cookies out of the oven when the edges are set {slightly firm}.  The middle will be soft {that’s where the “truffle” part comes in}.
~ You can freeze the cookies.  They are particularly delicious if you take them out of the freezer and wait for a couple of minutes before eating.  Their texture is dense, fudgy and GOOD!

Cookie close up

Bon appetit!


2 Comments

“The kitchen, reasonably enough, was the scene of my first gastronomic adventure. I was on all fours. I crawled into the vegetable bin, settled on a giant onion and ate it, skin and all. It must have marked me for life, for I have never ceased to love the hearty flavor of raw onions.”  James Beard (1903-1985)

First of all, I have to tell you that I am super excited about the class that I signed up for, which starts this Tuesday!  It’s called Science & Cooking:  from Haute Cuisine to Soft Matter Science.  It is offered through Harvard {yes, that Harvard!} and it’s free.  Scientists and chefs will be getting together to teach this course about the science of cooking.  Check it out!

This week’s farmers market find- freshly dug sweet Maui onions!  Yum!  We have been waiting for these & now they are here.

Group of Maui onions 1 Just about everyone has an opinion about onions.  We go through a lot of onions at our house, which is a good thing, because onions are a healthy food to eat, and they add great flavor to food. Group of Maui onions 3 We love all kinds of onions- green onions {aka scallions}, shallots, leeks, white onions, pearl onions, yellow onions and sweet onions {Maui, Walla Walla, Texas Sweets, Vidalia, etc.}.  They can be enjoyed raw, cooked or caramelized so that they are brown, sweet and jammy. Closeup of peeled  new Maui onion This onion was delicious in a salad with arugula, steamed beets and thinnings from the basil seeds I planted a few weeks ago {apologies to those who will not be growing basil outside for awhile!}.

Young Basil Seedlings 1

I hadn’t thought to pair basil with arugula, but it was a good match.  I consulted the Flavor Bible, which is one of my favorite books, and that is where I saw that basil and arugula go well together. Arugula salad with basil thinnings I dressed this salad with my usual arugula salad dressing of fresh lemon juice, extra virgin olive oil, freshly ground salt and pepper. Closeup of arugula salad with basil trimmings I have not always been an onion lover.  Like many kids, I ate my spaghetti with butter {I still love noodles with butter!}, salt and pepper.  I don’t remember if I had cheese on it, but if so, I’m sure it was that awful stuff in the green cylindrical can; you know the one to which I’m referring.  I think it was the onions in the spaghetti sauce to which my immature palate was objecting, but I’m not really sure why I didn’t want to eat spaghetti sauce.  I had no problem eating chili or beef stew, which definitely contained onions.  My mom’s {and now my recipe} delicious potato salad was eaten {by me} before the celery and onions went in.  It must have been the crunch, in addition to the onions, that I did not care for.  Crunch did not belong in creamy soft potato salad, in my opinion.  Mind you, I was not really a picky eater.  I ate just about everything, except celery, onions and this dressing that my grandmother made to dress dandelion greens.  It was some kind of cooked dressing, and I really did not like it.  In fact, I amazed my relatives with the quantities of food I consumed.  “Does she have a hollow leg?” they wondered.  “Where does she put it?” they inquired. Raw onions became a part of my diet in my early 20’s, when my husband returned from a business trip to Atlanta, GA with a sack of Vidalia onions.  He bought them at the airport, like tourists buy Maui pineapples at the Kahului Airport.  Boy, were those onions ever good; nice and sweet and perfect mingling in a bowl with sliced cucumbers, extra virgin olive oil, salt and pepper.  My mom makes great cucumbers and onions with apple cider vinegar, salt and pepper; I’m sure I just ate the cucumbers way back when.  Now, I can’t get enough onions.  Thankfully, most kids grow up and expand their food horizons to include foods they wouldn’t touch in their youth, but now find delicious. Several techniques can be employed to make onions more palatable, as well as make them more suitable for a particular dish.  The way an onion is cut makes a huge difference on how it tastes in any given recipe.  Click here to view a Fine Cooking video on a few different onion cutting techniques. I usually cut onions 4 different ways: Large Dice– Large dice is great for onions that will be cooked in spaghetti sauce, stew, vegetable soups, this quesadilla filling and that type of thing.  The large dice holds its shape during cooking, but at the end will be soft and pleasant to eat. large dice onion Minced- Minced onions belong in guacamole, potato salad, coleslaw, some bean salads and places where you don’t want to bite into a big piece of raw onion, especially when that onion isn’t a sweet variety. Minced onions Lyonnaise– Lyonnaise is also called “pole to pole” because you are cutting the onion in crescent shapes from the root end to the blossom end.  It is my favorite way to cut onions!  I love this cut for green salads, cucumbers and onions, pickled beets and recipes where I want to see the onion, and taste it, but not have big chunks.  When I cut this way, I always thinly slice the onions if they are to be served raw.  Even a strong onion {i.e. not a sweet variety} is palatable when thinly cut pole to pole. Lyonnaise cut onions 3 Sliced- Sliced onions are cut across the equator, and are great served raw or caramelized on a burger, sub {hoagie, grinder, etc.} or other sandwich.  I think onions for sandwiches should always be sliced paper thin; pile them on, but they must be thin or they will slide right off {Tomatoes too should be thinly sliced, but my mom will disagree with me here.} Sliced red onions If you are tired of your green onion slices rolling off the cutting board, try slitting the white part of the onion lengthwise, so you have half-moon slices-no more mischievous onion slices rolling around!

Not just a tasty vegetable and seasoning for many foods, onions have numerous health benefits.  Click on this link to the National Onion Association for nutritional information, tips and recipes.

This is  how one amongst us spent his day. . . not an ounce of friskiness in this pussycat! Jack napping

How do you enjoy onions?

Bon appetit!


2 Comments

“Good soup is one of the prime ingredients of good living.  For soup can do more to lift the spirits and stimulate the appetite than any other one dish.”    Louis P. De Gouy, ‘The Soup Book’ (1949)

Have you noticed a change in the weather in your area?  Maybe the mornings are a bit dewier than they were last month, and a sweater hits the spot in the evening.  We have noticed that the mornings and evenings are a little cooler here on Maui, even though the days feel about the same, nice and warm.  The first day of autumn is just around the corner {9/22}, which means it’s time to get out the soup pot.  Our soup pot is never far from the stove.  Even though we live on Maui, we eat a lot of soup, and surprisingly most of it hot soup, not cold.  We live at about 1200 feet altitude, on the slopes of Haleakala Volcano, so it is often cool enough to enjoy soup, especially when the trade winds are blowing, as they are now.  While it may feel warm outside in the sun, the breeze can feel cool in the house.  We eat soup for breakfast, lunch and dinner.  The soups we enjoy are all healthy; they are full of vegetables, high in vitamins and minerals and nutrient dense.   I realize that people who live in places with 3 or 4 seasons probably don’t eat much hot soup in the summer, but like I said earlier, ready or not, autumn is on its way.

If you haven’t made home made soup, I encourage you to try out a few recipes; you will be rewarded with several delicious meals that don’t have to be complicated to prepare.  There are some elaborate soup recipes out there, but the ones I make are pretty straightforward.  I assure you that the soup you create from top notch fresh ingredients will be far superior to any soup you get from a can.

This minestrone is one of our new favorite soups, and I highly recommend it.  This is the link to the original; what follows is my adaptation.

Lentil, Celery and Tomato Minestrone

adapted from the recipe by Martha Rose Shulman, who is the author of “The Very Best of Recipes for Health.”

1 cup lentils, rinsed
1 onion, halved
A bouquet garni made with 2 sprigs each thyme and parsley, a bay leaf, and a Parmesan rind
1 1/2 quarts water
1 tablespoon extra virgin olive oil
3 medium carrots, diced
3 celery stalks, diced
3 garlic cloves, minced {mince & let sit for 10 minutes for health benefits}
Salt, preferably kosher salt, to taste
1 28-ounce can chopped tomatoes, with liquid
Pinch of sugar
3 tablespoons tomato paste
About 1/2 small head of green cabbage, thinly sliced
1/4 cup chopped fresh parsley
Very thinly sliced celery, from the inner heart, for garnish
Freshly grated Parmesan cheese for serving
1. Combine the lentils, 1/2 onion and the bouquet garni with 1 quart water in a saucepan and bring to a boil. Reduce the heat, add salt to taste, cover and simmer 30 minutes.

2. Chop the remaining onion. Heat the olive oil in a large, heavy soup pot or Dutch oven over medium heat and add the onion, carrot, and celery. Cook, stirring often, until the onion is tender, about 5 minutes, and add the garlic and a pinch of salt. Stir together until fragrant, about 1 minute, and add the canned tomatoes with their liquid and the sugar. Bring to a simmer and cook, stirring often, for about 10 minutes, until the tomatoes have cooked down somewhat and smell fragrant.

3. Add the lentils with their broth, the tomato paste, salt to taste, an additional 2 cups water, and bring to a boil. Reduce the heat, cover, and simmer 30 minutes. During the last 10 minutes, add the cabbage.  Taste and adjust seasonings. Season to taste with freshly ground pepper, stir in the parsley and serve, garnishing each bowl with thinly sliced celery heart if you want some crunch, and passing the Parmesan at the table.

Yield: Serves 4 to 6Celery Minestrone Ready to Eat

Like most soup, this is even better the next day.

Nutritional information per serving (4 servings): 276 calories; 4 grams fat; 0 grams saturated fat; 1 gram polyunsaturated fat; 2 grams monounsaturated fat; 0 milligrams cholesterol; 49 grams carbohydrates; 12 grams dietary fiber; 392 milligrams sodium (does not include salt to taste); 17 grams protein

Nutritional information per serving (6 servings): 184 calories; 2 grams fat; 0 grams saturated fat; 0 grams polyunsaturated fat; 2 grams monounsaturated fat; 0 milligrams cholesterol; 32 grams carbohydrates; 8 grams dietary fiber; 261 milligrams sodium (does not include salt to taste); 11 grams protein

Notes:

* You may use any lentils that you like.  I usually use brown lentils, but if you like your lentils to hold their shape, you may want to use the French green lentils {lentils du puy}.

* I highly recommend the celery & Parmesan garnish.  Generally speaking, I find that if a recipe has a garnish, it’s best to put in the extra effort to put it on your soup.  A garnish can take your soup to a higher level!

*Please, please, please do not use what they call “Parmesan cheese” that comes in the green can!  Use the real thing; if you don’t use the real thing, you won’t have the Parmesan rind which adds a huge amount of flavor to your soup.  It really does make a difference!  Get more ideas on using Parmesan rinds to elevate your dishes to a whole other level here.

* If you do not have any kitchen twine, put it on your shopping list, and then you can tie your bouquet garni with a green onion top or chive {don’t tie too tight or they will break!}.

Bon appetit!


1 Comment

Salad with Purslane & Ribbons of Parmesan

“When weeding, the best way to make sure you are removing a weed and not a valuable plant is to pull on it.  If it comes out of the ground easily, it is a valuable plant.”  Author Unknown

I do not know if purslane comes out of the ground easily or not, but I have seen it defined both as a weed and a valuable plant.  Purslane is purported to be a healthy plant that we should be enjoying.  It is a good source of omega-3 fatty acids, antioxidants, vitamins and minerals.  Check out the articles at the end of this post if you would like to read more about purslane’s health benefits.  My husband bought our first bunch of purslane 2 weeks ago, at the Upcountry Farmers Market.  It’s great!  What I like most about purslane is its chew, due to the fact that it is a succulent.  I think it has a subtle flavor, not at all assertive, but just tasty. . .green.  Apparently it grows everywhere, but I can’t say I’ve encountered any on my walks around Pukalani, where we live.  You will most likely not find purslane at your local grocery store, but look for it at your farmers market.  Or grow it yourself; from what I’ve read, it is easy to grow.

When I cleaned the first bunch of purslane, I meticulously removed the leaves from the stems.  I discovered on the second bunch that “de-leafing” {is that a word??} the stems is not necessary, and that the stems also add a bit of chew to a salad.  The leaves are in clusters on the stems, so that makes them pretty in a salad.

Salad with Purslane & Ribbons of Parmesan

This is not a tossed salad, but more of a composed salad, which I think is prettiest served on a plate. The ingredients are few and the salad is delicious.  When you start with excellent ingredients, you do not need much to create great food.

Place a layer of tender lettuce on a plate.  Some good choices are Bibb, Manoa or red leaf.  A crunchy lettuce like romaine doesn’t work in this salad.  Texture is important in this recipe; there is a pleasant “chew” but it isn’t a crunchy salad.

Top the lettuce with some onion that you have sliced paper thin.  Use whatever type of onion you prefer, although I wouldn’t choose green onions for this.  Slicing the onion super thin makes it seem less pungent, making it easier to eat for the “non-onion types.”

Now add a scattering of paper thin purple cabbage.

Top with purslane, preferably in clusters of leaves, as opposed to individual leaves; this adds to the salad’s texture.

Sprinkle the salad with some pumpkin seeds that you have pan roasted, preferably in coconut oil.

Season the salad with freshly ground salt and pepper, then sprinkle with fresh lemon juice {about 1/4 of a juicy lemon per salad} and a drizzle of good extra virgin olive oil.  Use a light hand with the dressing, as you don’t want your salad to be swimming in dressing.

Finally, take a vegetable peeler and shave some nice ribbons of fresh parmesan cheese over the salad.

Salad with Purslane and Ribbons of Parmesan

Related articles

Bon appetit!


4 Comments

“Large, naked, raw carrots are acceptable as food only to those who live in hutches eagerly awaiting Easter.”  Fran Lebowitz

I’m okay with raw carrots, I really am.  But I think carrots really sing when they are cooked.  They belt out their ultimate deliciousness when they are roasted.

You know how roasting vegetables caramelizes them and makes them nice and sweet?  And tender and delicious?  Well, dribble some coconut oil and a heavy dusting of Moroccan spices into the mix and you’ve got a winner.  I would be proud to serve these vegetables to anyone.  Next time I will add some chunks of onion and garlic.  Make a lot, because you will not want to run out.  Consider yourself warned!

Roasted carrots and potatoes with Moroccan spices final
Roasted Potatoes & Carrots with Coconut Oil & Moroccan Spices

1 large potato {peeled if not organic}, cut into chunks
3 large carrots {peeled if not organic}, cut into chunks
1 medium onion, cut into chunks
Coconut oil
Freshly ground salt & pepper
Moroccan Spice Mix {recipe below}
2 cloves of garlic, mashed into a paste

Cut the potatoes, carrots & onions into pieces that will cook in about the same amount of time.  Put in a bowl large enough to comfortably {& neatly} toss the vegetables with the coconut oil & seasonings.  Start with about 1 tbsp. of coconut oil; if that coats all the vegetables nicely, then that’s enough-you don’t want greasy vegetables.  Season with plenty of freshly ground salt and pepper, and a generous dose of the Moroccan Spice Mix.  Line a sheet pan with foil, then spray with pan spray to prevent sticking {I used coconut oil spray}.  Arrange the vegetables on the pan in a single layer.  Roast in a 375 degree oven, stirring occasionally, for about 30 minutes.  You can leave them in for a while after they are tender, because they will turn a lovely golden brown, which makes them super tasty.  When they are golden brown, put them back into the big bowl.  Add the garlic paste and mix it all up.  The heat from the vegetables will cook the garlic and impart a delectable garlic flavor.

Serves about 3 roasted vegetable lovers

Moroccan Spice Mix

2 tsp ground cumin {preferably whole seeds toasted, then ground}
1 tsp ground coriander
1/2 tsp chili powder  {I used my homemade chili powder; use whatever chili powder you like}
1 tsp sweet paprika
1/2 tsp ground cinnamon
1/4 tsp. ground ginger
1/8 tsp. cayenne pepper
Pinch of ground cloves
Mix it all up & store in a tightly lidded jar.

Homemade Chili Powder

3 T sweet paprika
1 T ground cumin {preferably whole seeds toasted, then ground}
2 T oregano {preferably Mexican}
1 tsp ground cayenne pepper
1/2 tsp garlic powder {yes, there is the occasional use for garlic powder!}
1 whole dry ancho chile, broken up
1/2 tsp celery seed
1 tsp coriander seed

Put all ingredients into a small food processor or blender, and process until the pieces of ancho chile are ground.  Store in a tightly lidded jar.

Bon Appetit!


1 Comment

“Education is not preparation for life; education is life itself.”  ~John Dewey

For some reason, I am having a hard time settling down to write.  My mind has been wandering quite a bit lately, as I think about my friends in the Central Kitsap School District who gathered together again this past Monday, after about 8 weeks of well-deserved summer vacation. This is the week of back to school teacher meetings, sprinkled with moments to prepare classrooms for the children, who are coming next week.  Going back to school is a mixed bag of emotions; it means the return of early morning alarms, and giving up your free time but at the same time, you get to see your friends and the kids again for the camaraderie and excitement of a fresh new year.  Here’s hoping for a wonderful school year for all!

I’ve wanted to write about yogurt for a while now.  We eat yogurt because it tastes good, but also because it is a healthy food.  If you want to eat yogurt for its health benefits, there are a few things to be considered.  Cultured or fermented foods, of which yogurt is one, provide beneficial bacteria for your gut, which is a good thing.  But all yogurts are not created alike.  Look for yogurt that contains the most variety of live active cultures; the more the better.  Yogurt that has fewer ingredients is better for you.  Some yogurt is full of added sugars, colors, stabilizers and other such ingredients which are not needed.  We like to buy plain low-fat yogurt, specifically Nancy’s.  Using plain yogurt allows you to customize your yogurt any way you like.  Plain yogurt is like a blank canvas.  Here is a generic “recipe” to follow to create a fabulous yogurt breakfast.  It’s really up to you to add whatever you like.

Put some yogurt in a bowl.

Add fruit if you want.  This can be frozen fruit, fresh fruit, fruit jam that you have made preferably with minimal added sugar {like our peach jam that I told you about}.

Add a grain.  This can be cooked quinoa, brown rice, 2 tbsp of Buckwheat Chia Crunch, raw oatmeal {regular, not quick cooking, which can make your blood sugar spike} or granola {this granola is our current favorite-I reduce the maple syrup to 1/2 cup and the brown sugar to 1/4 cup}.

Make it nutty!  Toss in some nuts or seeds and maybe some cacao nibs for a little nutritious chocolate “punch.”

Mix it all up & taste it.  If it needs a little sweetening, add a little local honey or Grade B maple syrup.  Maybe a few splashes of vanilla would be tasty.  Once you get used to plain yogurt, you will find the presweetened stuff way too sweet.  If we use a drizzle of maple syrup or honey it is most likely for the nutrients more than the need for additional sweetness.

Sprinkle with cinnamon {tastes great & is good for your blood sugar}.

Enjoy your nutritious bowl of deliciousness!

This slideshow requires JavaScript.

Buckwheat Chia Crunch for Yogurt

1/4 c hemp seeds
1/4 c buckwheat {I prefer untoasted buckwheat groats.}
1/8 c chia seeds
1/8 c ground flax seeds {best to grind your own in small quantities as needed}
1/8 c dried fruit, cut into small pieces {optional}

Mix together in a small jar.  When ready to eat, shake it up so you get all of the ingredients.  Use about 2 tbsp per serving.

Makes about 3/4 cup

Here are a couple more ways that we like to jazz up our plain yogurt.

savory yogurt This is my savory breakfast yogurt.  It includes diced cucumber, tomatoes, minced jalapenos, cilantro, cumin & a drizzle of extra virgin olive oil.  It is delicious with a Ry-Vita Cracker spread with butter, or a buttered piece of toast.

mixed berry yogurt This has Buckwheat Chia Crunch, unsweetened flake coconut, cacao nibs & mixed berry jam {made from Costco frozen mixed berries & a little sugar}.

This is an excellent article about. the healthy bacteria in our bodies.

Sources:
The 150 Healthiest Foods on Earth {Jonny Bowden, Ph.D., C.N.S.}
Super  Foods {Steven Pratt, M.D.}

Nut Lovers Bars with Dark Chocolate & Coconut

Leave a comment

“There’s a rule in baking.  When you smell it, it’s done.  I don’t know about the science here.  But it’s a good indicator.  If you’re in the other room enjoying the nice smells of your cookies, you better get up and take them out!  ”   Frank Mentesana {Once Upon a Tart}

Nut Lovers Bars with Dark Chocolate & Coconut

My Nut Lovers Bars with Dark Chocolate and Coconut are great because. . .

  • they all bake at the same time.   No rotating of cookie sheets or baking multiple batches.
  • they are a layered cookie, and go together quickly.
  • several of the ingredients are heart healthy and/or what some consider superfoods {walnuts, almonds, pecans, dark chocolate and coconut.
  • they are deliciously crunchy, chewy & tasty at the same time.
  • they are visually beautiful!  The nuts sport a lacquered look when they come out of the oven.  Add a little pearl dust and they are even prettier!
  • people like it when you bring them to potlucks.

Seriously, if you like nuts and chocolate, you should bake these cookies.  They are gorgeous, scrumptious & easy to make.  What more could one want in a cookie?  The ingredients play nicely together so that even those who do not like coconut enjoy them.

Nut Lovers Bars with Dark Chocolate & Coconut

½ cup butter
1 cup crushed graham cracker crumbs {about 8 whole sheets}
2 cups chocolate chips {I use Ghirardelli 60% Bittersweet}
1 1/3 cups unsweetened coconut {flaked or shredded}
About 3 cups nuts {I use walnuts, pecans & almonds.  I break the walnuts & pecans, and cut the almonds into thirds.}
1 can sweetened condensed milk

Preheat oven to 350 degrees.  Put the butter in a 13”x9” pan and let it melt while the oven is preheating.  Mix graham cracker crumbs with the butter and press evenly in the pan.  It looks like you don’t have enough to go around the whole pan, but you do.  It isn’t a thick layer.

Sprinkle evenly with chocolate chips, coconut & nuts.  Pour sweetened condensed milk evenly over everything.  I drizzle it going one direction and then drizzle it going the other direction until it’s all out of the can and onto the cookies.

Bake cookies for about 30” or until nuts are golden brown.  You want the cookies to have some golden color before you take them out; the toasty nuts is part of what makes them so delicious.  I like to brush them with edible pearl dust, but if you don’t have any handy, they will be just as good.

Closeup of Nut Lovers Bars with Dark Chocolate & Coconut

Around the Web. . .

This is totally cute!  Check out this video of Seattle chef Jesse Smith making naan bread with his adorable little girl Avalon.

Spilled Milk {a podcast about food-recipes, info with some humor thrown in}

Bon appetit!


Leave a comment

The Bee’s Knees & Catnip

“We lived for honey.  We swallowed a spoonful in the morning to wake us up and one at night to put us to sleep.  We took it with every meal to calm the mind, give us stamina, and prevent fatal disease.  We swabbed ourselves in it to disinfect cuts or heal chapped lips.  It went in our baths, our skin cream, our raspberry tea and biscuits.  Nothing was safe from honey…honey was the ambrosia of the gods and the shampoo of the goddesses.”    Sue Monk Kidd  The Secret Life of Bees 

People eat honey for a variety of reasons-as a sweetener, because it tastes good, it has health benefits {if you eat the correct honey}.

Honey Bear  Before we go any further, let’s talk about The Bear.  If you eat honey from The Bear,  I am suggesting right here and now that you give up the plastic honey bear.  Sure, he’s convenient and cute, but how tasty is plastic squeeze bottle honey?  And, how many nutrients are in plastic squeeze bottle honey?  The “bear honey” bears no resemblance whatsoever to raw unfiltered honey; they are completely different foods.  If you want some health benefits from your honey, look for local honey that hasn’t been filtered or heated.  This kind of honey contains plant polyphenols called flavonoids; these flavonoids have antioxidant activity and are important to human health.  In general, the darker the honey, the better it is in terms of its antibacterial and antioxidant qualities.  Also, the harder the honey, the better it is for you.  We do not eat a lot of any kind of sugar, but we love this Maui Wildflower Honey that we find at the Upcountry Farmers Market .  Without a doubt, it is the best tasting honey we have ever eaten, it is dark and delicious with complex flavors.  It’s the bee’s  knees!

Maui Wildflower Honey

How do we eat honey?  Here are a few of our favorite ways to eat this sweet treat:
* drizzled on yogurt
* a wee bit in salad dressing {i.e. French dressing, mustard vinaigrette} smooths out the dressing’s acidity
* on freshly baked biscuits, cornbread or muffins
* in yeast bread
* licked off the spoon!
* great in hot tea or hot lemon water in the unfortunate event of a sore throat-this really works!

How do you like to eat honey?  What kind do you like?

Honey is still sugar, so I’m not saying that you can eat it with abandon.  Moderation is the key here, as it is with many things.  Please do not feed honey to children under one year old, as there is a risk of botulism.

Just a spoonful of honey

Sources of information:
* Super Foods Health Style: Proven Strategies for Lifelong Health {Steven Pratt, M.D.}
* The 150 Healthiest Foods on Earth {Jonny Bowden, Ph.D., C.N.S.}

The Actual Cat Mint

Catnip

Occasionally, Gerald and Sharon like to enjoy a glass of Cabernet while they are cooking dinner.  Gerald bought me a pot of catnip {highfalutin cats may call it catmint, but I’m told that the end result is the same} at the farmers market, and I sometimes enjoy some before dinner; in fact, I find that when I have a bit of “nip” I don’t tend to eat as much, and I feel fantastic!  it’s a win-win situation, because Gerald and Sharon are watching my figure.  Sharon snapped a few photos of me after I noshed on some catnip this afternoon.  I highly recommend regular nibbling on catnip for felines everywhere!
~ Jack

This slideshow requires JavaScript.